Want to Disable Windows Defender in Windows 11 ? Here's your Solution :
Disabling or Enabling "Windows Defender" in Windows 11 :

Users who are using Windows 10 must be well aware about windows security suit which protect users from basic viruses "Windows Defender", Microsoft shipping Defender bundled with Windows Operating system from long time actually. Ofcourse windows defender upgraded a lot from it's initial version.
Putting aside about security that windows defender gives, User whose RAM is less always have issue with defender because it consumes a lot of memory space in windows due it's security protocol the app must run real time security scan frequently so high amount memory must be consumed. So, many user wanted to get rid of it. If you also one of them let's get into details now :
Disable Windows Defender in Windows 11 :
We are proposing 3 different ways to Disable Let's see below one by one
Disable from Settings :
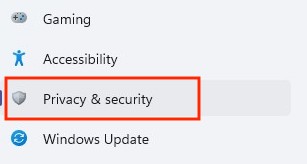
=> Open the Settings and go to the “Privacy & security” tab. Under the “Security” section, click on “Windows Security”.
=> Now, click on “Open Windows Security”. Your Windows 11 PC will open the Windows Security app in a new window.

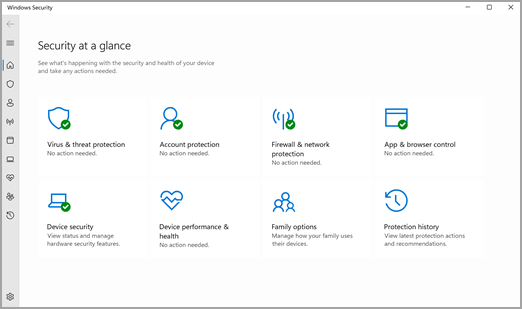
=> You can see Windows Security’s home screen. Here, click on the “Virus & threat protection” option.
=> Under the “Virus & threat protection settings” section, click on “Manage settings” to change the settings of Defender.
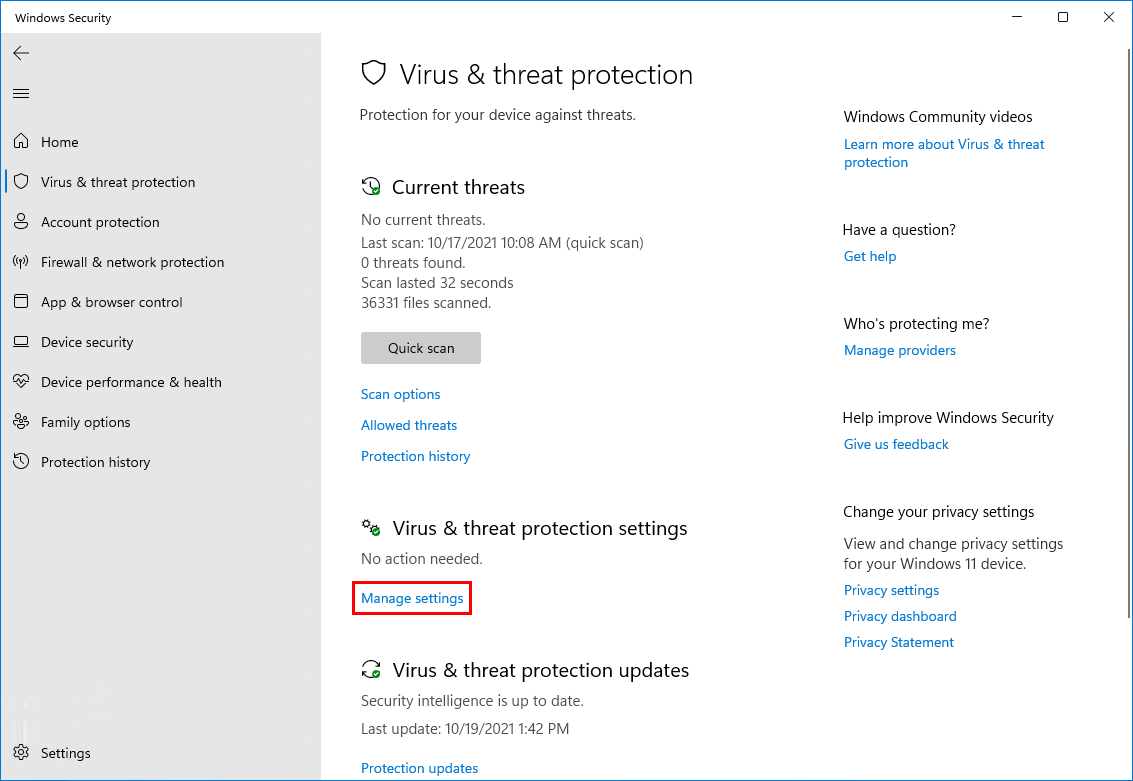
=> Now you get settings to configure Defender, there disable the “Real-time protection” switch and other switches on the same page to temporarily disable Windows Defender.

With this Process Windows Defender get DIsabled but temporarily only after restart or after some time windows will re activate defender automatically as this is a security default feature from windows, you can't disable defender permanently through this. If you want to disable defender permanently see below.
Disabling through "Group Policy Editor" :
=> First of all, we should disable “Tamper Protection” from the Windows Security app. You can disable from : Windows Security >> Virus & threat protection >> Manage settings.

=> After Disabling Tamper Protection, open a Run window by pressing “Win+R” and type “gpedit.msc” to open the Group Policy Editor.
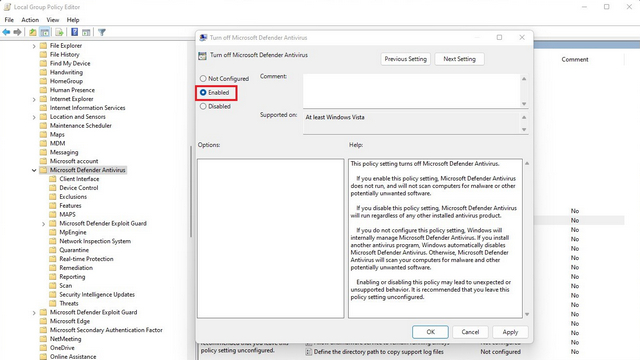
=> Navigate to " Computer Configuration > Administrative Templates > Windows Components > Microsoft Defender Antivirus " and double click on "Turn off Microsoft Defender Antivirus" which will be shown in right side of the screen.
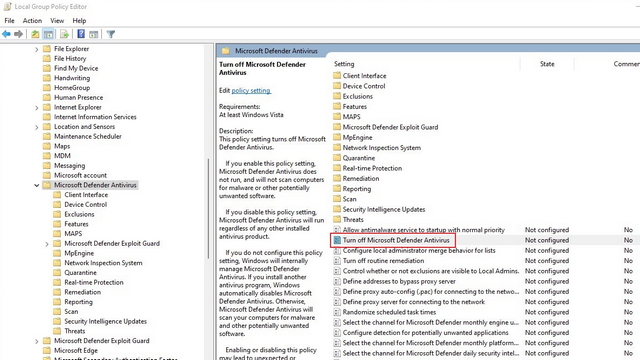
=> In the next pop-up window, select “Enabled” and click “OK” to apply the changes. Once all done, restart your PC. After restart windows defender will no longer run on PC. To re-enable Defender through Group Policy Editor, all you need to do is just choose “Disabled” instead of Enabled and hit “OK”.
Disable through "Registry Editor" :
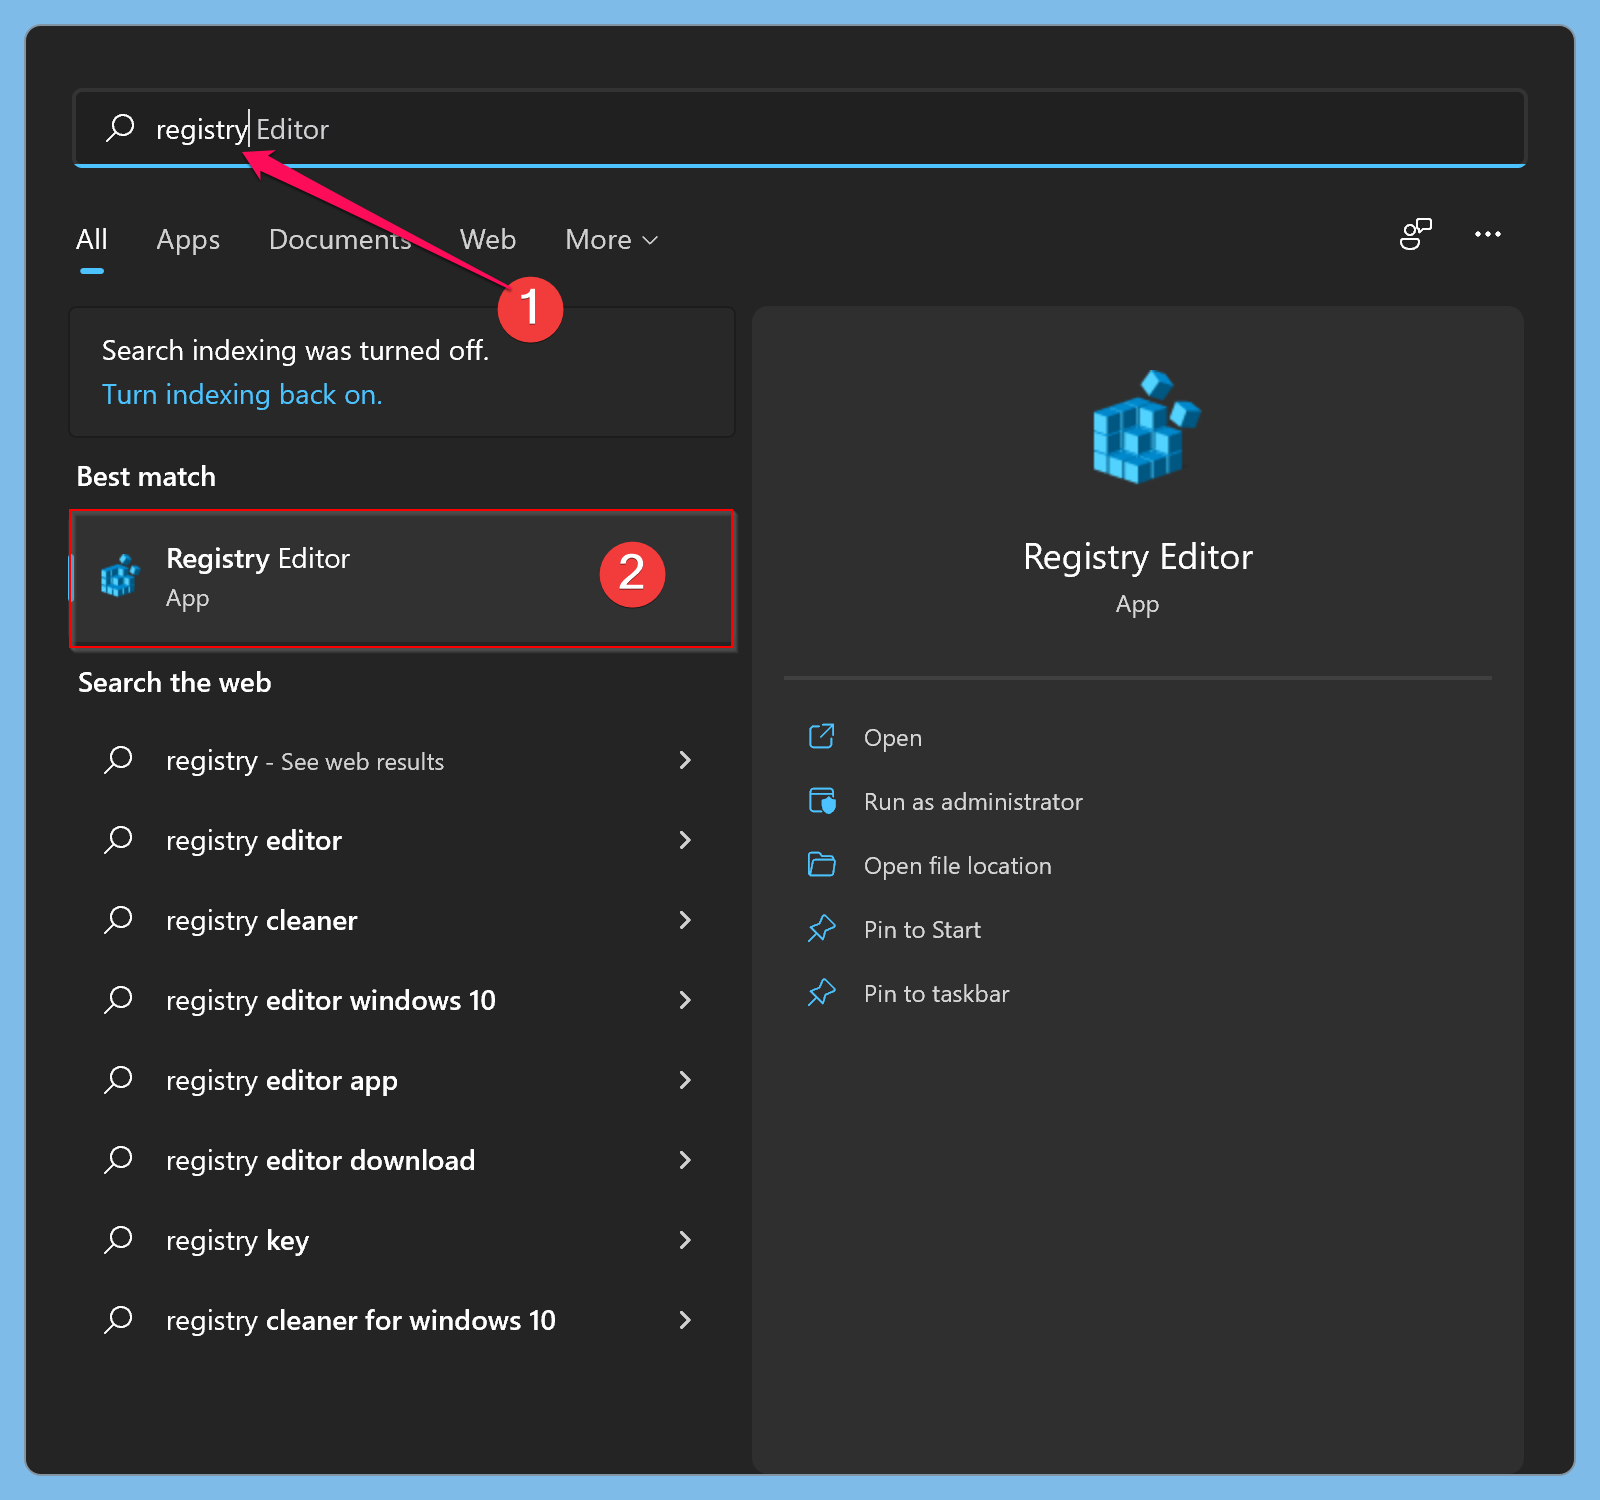
=> Press the Windows key once, type “Registry Editor”, and choose “Run as administrator” to open the program with admin privileges.
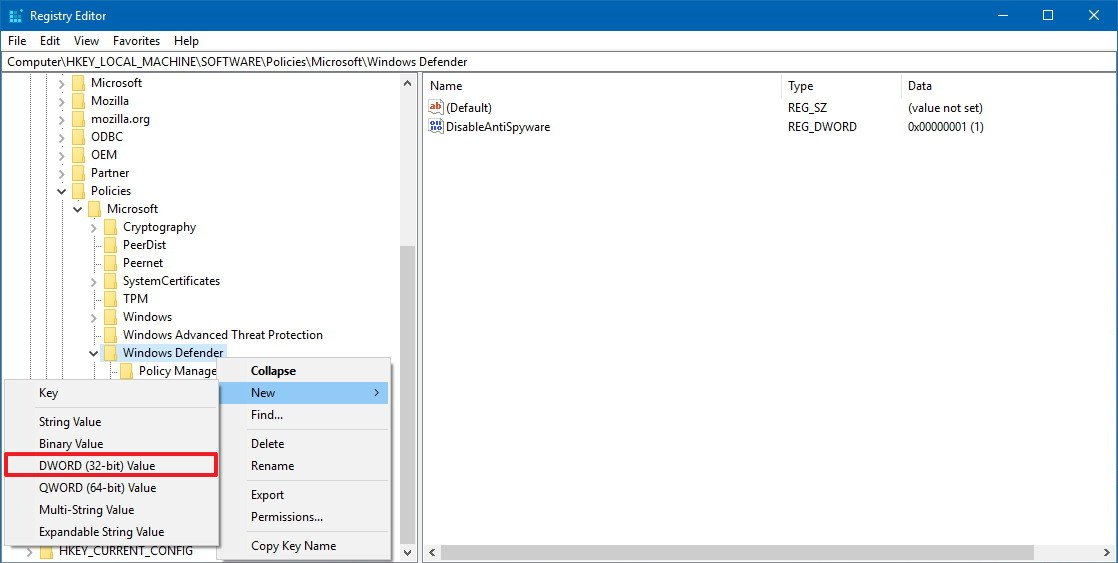
=> Now, Navigate to " HKEY_LOCAL_MACHINE\SOFTWARE\Policies\Microsoft\Windows Defender " and choose New -> DWORD (32-bit) Value. Name it as “DisableAntiSpyware”.
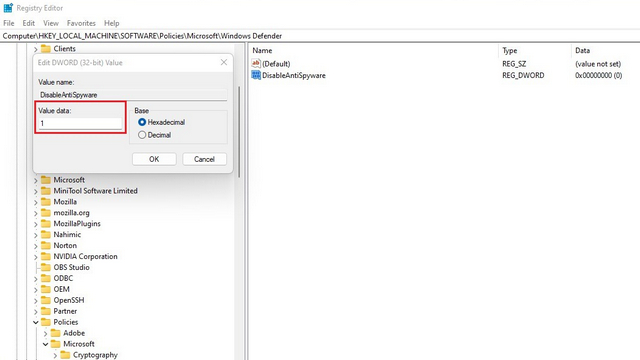
=> Double-click “DisableAntiSpyware” which we created now, and set its value data to “1”. Once you are done, press OK.
=> You can create new folders within Registry editor, all you have to do is right-click on the parent “Windows Defender” directory and choose New >> Key.
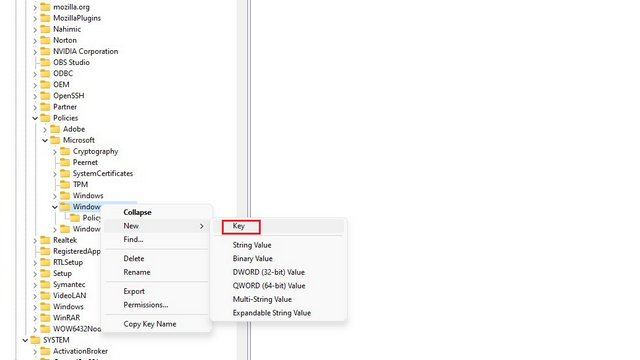
=> You can then name the key based on the path we are about give you because you need to create some folders now.
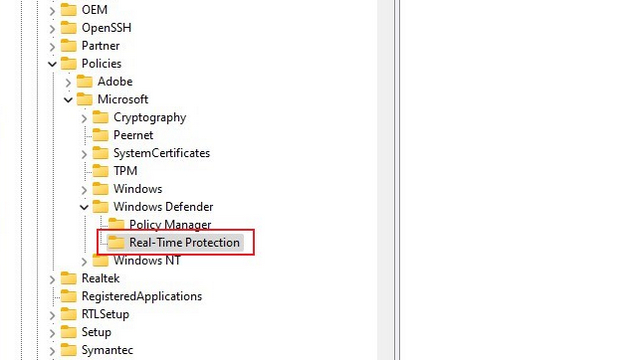
=> Now, you know how to create folders now we will give you path, create dword file like above we did.
[HKEY_LOCAL_MACHINE\SOFTWARE\Policies\Microsoft\Windows Defender]
"DisableAntiSpyware" dword:1
"DisableRealtimeMonitoring" dword:1
"DisableAntiVirus" dword:1
"DisableSpecialRunningModes" dword:1
"DisableRoutinelyTakingAction" dword:1
"ServiceKeepAlive" dword:0

[HKEY_LOCAL_MACHINE\SOFTWARE\Policies\Microsoft\Windows Defender\Real-Time Protection]
"DisableBehaviorMonitoring" dword:1
"DisableOnAccessProtection"dword:1
"DisableScanOnRealtimeEnable" dword:1
"DisableRealtimeMonitoring" dword:1

[HKEY_LOCAL_MACHINE\SOFTWARE\Policies\Microsoft\Windows Defender\Signature Updates]
"ForceUpdateFromMU"dword:0

[HKEY_LOCAL_MACHINE\SOFTWARE\Policies\Microsoft\Windows Defender\Spynet]
"DisableBlockAtFirstSeen" dword:1
If you perform all these steps you can successfully disable windows defender permanently.
Enabling Windows Defender :
=> Open Settings app and open “Privacy & security” tab. Now, select “Windows Security” under the “Security” section.
=> Windows Security page appears, click the “Open Windows Security” button. The Windows Security app will now open.
=> Now you can see Windows Security’s home screen. Here, click on the “Virus & threat protection” section and click on “Manage settings” to re-enable Windows Defender.
=> Now, enable the “Real-time protection” switch alongside other switches on the same page to get Windows Defender’s protection back.
So, This is how you can re-enable your windows defender. If you have good RAM we recommend you keep running defender as this gives basic protection for our PCs. Incase you install any anti-virus windows will turn off defender adn make your installed Anti virus as default security suite.


0 Comments
Let us know what you have in mind