• Home
  • Mobile
    • OS
      • Android
      • Apple IOS
      • One UI (Samsung)
      • Color OS (OPPO)
      • Funtouch OS (Vivo)
      • MI UI (Xiaomi)
      • Harmony OS (Huawei)
      • Oxygen OS (Oneplus)
    • New Releases
    • Gadgets
    • Rumoured
    • Update Notes
  • PC
    • Windows 10
    • Windows 11
  • Tech News
  • Apps
    • Android
    • IOS
    • Early Access
  • How to Guide
  • More
    • About us
    • Contact us
    • Privacy Policy
    • DMCA
*Welcome Everyone please note that out site has been moved to the New link with dedicated domain you can navigate Click Here to access our site all content will be found there and new content is being posted there as well.
*Click Here to go to New Site

Here's how you can use Visual Search in Edge Browser :


As we all know that Microsoft had developed it's Own web browser based on Chromium open source code instead of their Internet Explorer where replaced the same as well. After launching the application to public till now Microsoft pushed many updates to the app and in the same line now Microsoft is planning to include anther feature into the application which is Bing’s visual search. Apart from the ability to search images through an option in the right-click context menu, there’s now also a dedicated visual search button that appears when you hover over images. We already know that google already integrated their Lens into Google chrome like wise Microsoft integrated their visual search option in edge browser. Let us see how you can get that feature in the Microsoft Edge browser. 

Microsoft's Visual Search :

Visual search is a Microsoft's feature that lets you look up images from websites on Microsoft’s search engine Bing, Which can be used in Edge browser. The feature will come in handy for anyone who frequently searches images for the source or looking for similar images, it is merged with edge browser long back but it can be accessed through using bing search engine. Microsoft has been testing the Visual Search feature since Edge 96, Now it is enabled it by default with Edge 99. Here's how you can enable it.


Process to Enable the feature :

=> Open Edge browser and go to settings by clicking on three dots on the top right side


=> Navigate to Appearance tab Click on Visual Search option under Context menu options :


=> Enable “Show visual search in the context menu” and “Show visual search on image hover” switches. Now you can get the option to hover over any image to search it on Bing.


This is how you can enable the visual search in Microsoft Edge browser and you can also disable the same from the process by disabling those 2 options in above screenshot.


Disable for Specific Websites in Microsoft Edge :


If you don't want to use this visual search on some websites you can block those specific websites. So that you won't get this feature on that particular websites. Here is how you can do that

=> Open Edge browser and go to settings by clicking on three dots on the top right side


=> Navigate to Appearance tab Click on Visual Search option under Context menu options :


=> Click on the “Add” button next to the “Visual search is turned off for these sites” option.


=> Now type or paste the URL of the website you would like to disable visual search on. After entering the URL, click the “Add” button, and you are all set. The browser will no longer show the visual search button on this specific website.


=> If you want to use this feature again on blocked site, click on the trash icon next to website’s name to make Visual Search functional on that website.


This is how you can Exempt a specific website to avoid using the feature and how you can delete the same from list and personally we advice you to turn this off this feature for your back up or cloud storage sites which will avoid searching your personal pics accidentally.


 This is how you can speed up Windows 10 PC :


Windows 10, It is one of the widely used PC operating systems in the world. After closing support for windows 7 Microsoft able to get more users base for it's windows 10 System. Over the years windows had upgraded a lot, Despite of it's popularity and wide spread it still have some issues and windows used to clear them through updates as well. Due to usage of high number of apps or due to low RAM or may be Old PCs whatever the reason some users face lagging issue, Here we have figured out some solution where you can fix maximum problems by configuring your PC.

Start up Programs :

Some Application while they are installing in to our PC they took permission from us to Start the app while windows boot, Applications having such permissions will start automatically every time you boot your windows, This process may show big impact on system's performance and may lag the system as well. So, check them and try to disable the same.

=> Open task manager by clicking ctrl + shift + Esc keys or else you can get the same by right click on task bar.


=> Once Task bar opened move to the “Startup” tab and check for unnecessary apps. Right-click on applications and click on “Disable”.


Block Apps after Reboot :

It is different from Startup apps. Windows 10 allows some apps to restart their services and launch the last session so the apps are ready at launch. Which took some space and impacts on performance of your PC. Let's see how to disable this.

=> Click on windows button and type "Restart apps" which shows the feature option in list and open it


=> Once the feature opens in settings window you can simply turn it off if it is enabled.


Disable Cortana :

Cortana is windows voice assistant and if you are a big for this and don't want to disable it you can skip this step and if you are not supposed to use this feature you can disable because Cortana uses a lot of computer resources, Here is how you can disable the same :

=> You can simply disable Cortana from Task Manager application in start up if you want to disable it permanently check below process.


=> For these steps thanks to beebom, they have registry files with which we can enable and disable Cortana permanently from this link you can get those file download them and run Disable Cortana file.


=> Once you double click on the file it asks you to upload keys to registry for security purpose once you give permission it will be write to registry and Cortana will be disabled and if you want to enable again then use enable file as well.


Background Apps :

Background apps are Windows apps that run in the background to receive notifications and updates. While messaging and email apps may require background sync, apps like Candy Crush and Calculator don’t need it at all. These apps continuously run in the background and make the computer slow, besides draining the battery. Disabling these apps speed up your windows PC, here's how 

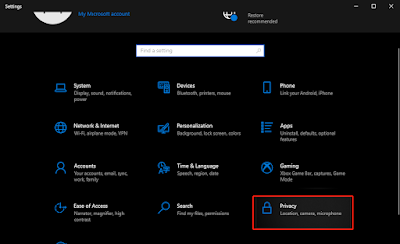
=> Open Privacy from Settings window of your PC


=> After clicking on Privacy you get menu, scroll that menu and click on "Background apps" option and turn it off to disable background application.


Remove Junk :

To speed up your PC you should periodically clean up junk files on your PC. These files stay on the hard drive and eat up space even though they have no utility in the functioning of the OS. You to use Windows 10 tool to clean up your PC. Here's how you can configure this.

=> By clicking windows key search for Storage in sear box so that you can get the application like below, open that option 


=> Now click on temporary files from the menu click on it


=> Now, Click on Remove files, So that you can clear al Junk files with one click


Configuring Windows Settings :

We can configure windows system to get high performance from our PCs let's check this out

* Privacy Settings :

=> Go to Privacy from settings window :


=> Now go to Diagnostic and feedback tab and make changes as shown in screenshot below.


* Power Plan Configuration :

=> Go to System from Settings window


=> Now go to Power & Sleep option and find for Additional Power Settings option from there 


=> You should see a High performance option here then activate the same if you didn't get one create your own plan from the option in left pane, In this way you can customize your performance.


* Delivery Optimization :

It uses computers on the local network to transfer chunks of Windows update files to the nearby PC. If you keep it turned on, then your PC may be used as a node to connect with other PC for sending update files. Turning it off will speed up your PC, Here's how you can do

=> Go to Update and Security from Settings menu


=> You can use Advanced Options under windows update tab


=> Now go to Advanced options and click on delivery optimization by scrolling down


=> Turn off this option shown in below screenshot and you are done with this


Visual Effects Configuration :

If you got the less powerful GPU it is better to disable Visual effects so that your PC will offload taks and boost your PC performance.

=> Type system settings in search bar by clicking on windows button and open View advanced system settings option.


=> You can get a window with Advanced settings menu, click on Settings under performance  here


=> Now you will get new window then select Adjust for Performance and then click on apply then you are done and you can see huge leap in performance after this.


Multiple Anti-Virus :

We won't Recommend using Multiple Anti-Virus Programs for your PC using Single Anti-Virus is enough to protect your PC, In any case Defender can't remove Malware from your PC your Anti-Virus will do that if you have installed more than 1 please uninstall as they are also one of the issue in lagging PC.

Storage Upgrade :

Using SSD storages is better and it will give boost to your PC in terms of performance. Comparing with Hard disks SSDs will give great performance leap to your PCs, try them out.

Check Background Processes : 

Keep Checking your PCs Background Processes because in some cases some unnecessary tasks which runs in background may cause slowing down your PC

=> From your Task Manager you can check process details and you can End those tasks which are unnecessary.


Graphics Settings :

If you have high performing GPU you can force all apps to use your GPU instead of CPU which will decrease load on CPU and give you good performance, you can do so by 

=> Search for Graphic Settings in windows search and you will get the option to configure the same


=> Click on any application in your PC and select High Performance option so that you can able to assign these graphic tasks to your GPU instead of CPU


Game Mode Settings :

If you didn't Play games in this PC it is better to disable game mode so that you can get boosted performance.

=> Search for Game Mode in windows search bar by pressing windows key


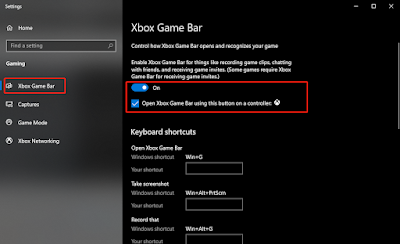
=> Turn off game mode in the pop up settings window


=> Then go to X box settings and turn everything off


Disable Windows Update :

If your PC is old or you don't need to update your device we can help you here and also updating a windows PC makes PC lagged by using many resources as well, you can click on anywhere on this test which will navigate to full post how many ways you can disable updates in your Windows PC.

Remove Bloat ware (Took Inspiration from beebom about this process and all credits to team beebom) :

Windows has become incredibly bloated with useless apps and services. These apps take up crucial RAM, processing power, and disk space. It significantly slows down the system, leaving you with a laggy mess. The sad part is that you can’t even uninstall these apps through the Control Panel. So, we are using Administrator privilege and Execution Policy as a workaround to remove such apps and services. Here are the steps to do it, which will finally speed up Windows 10 significantly.
Note: We are using an automated PowerShell script to debloat Windows 10. It’s developed by a developer named Sycnex on GitHub. Also, make sure you are using Windows on your Administrator account for this to work.

=> First up, download the Windows 10 Debloater ZIP file from the GitHub page. Click on the “Clone or download” button and then click on “Download ZIP”.


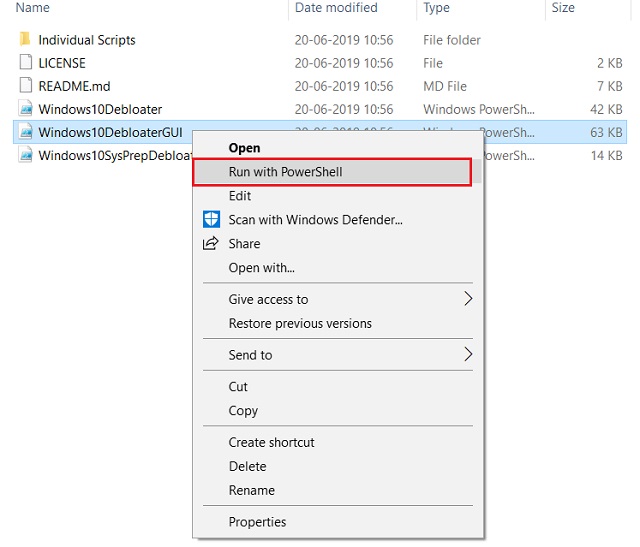
=> Extract Zip which is downloaded and you can see the file in them and Run Windows10DebloaterGUI  with Run With Powershell option.


=> On the first run, it will ask if you want to grant Execution Policy permission to the script. Type “Y” and hit enter to allow the PowerShell script to run.

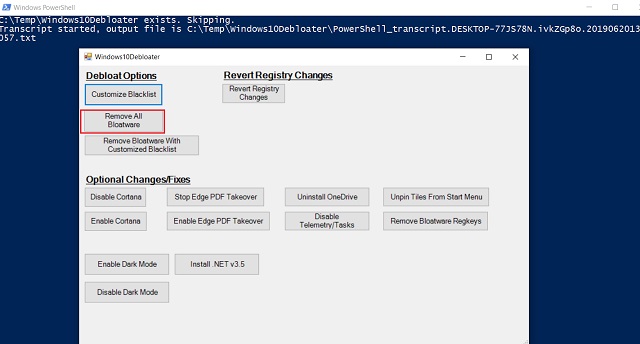
=> Now Windows 10 Debloater window will open. Here, click on “Remove all bloatware”. It will start removing such apps and services.


=> The process will take some time to complete so keep patience. Also, you will be prompted with many dialogues during the process to re-confirm your action. So keep a check on your PC during the process.

=> After the debloating process is complete, simply restart your PC. Now Windows 10 will become completely bloat-free without unnecessary apps. You will notice a remarkable boost in your Windows 10 computer’s performance.

=> Apart from this, Beebom specialist recommending to click on “Disable Telemetry” to cut off all telemetry services in the background. This will significantly increase your computer speed running Windows 10.

 
These all are the Processes to speed up your PC performance, Check them and try them then you can get fast PC compared to previous


Here's how you can enable Group Policy editor in Windows 10 / 11 :


As we all know about Microsoft Windows Operating System some of us didn't know that windows system have different version which they named like Windows Home, Windows Pro, Windows Enterprise editions. Home version can be used by students and general users and Pro versions used by Professionals where as Enterprise edition will be used by Enterprises. Main difference between these are some options and features will be disabled in some versions. In the same way Group Policy Editor was disabled system wide in Windows Home editions. So, by using simple batch file and configuring it we can get the same on our Home edition of windows for free. Let's get into details now :


=> First of all as we said above we need to download a batch file which is created by MajorGeeks. You can get this by clicking here

=> Once you downloaded the file now right click on that file and run the file with Admin privileges.


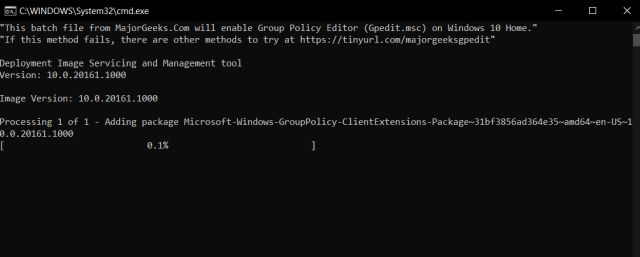
=> Once you the Run the batch file you will find a CMD file installing the features which will take up to 5 minutes or less.


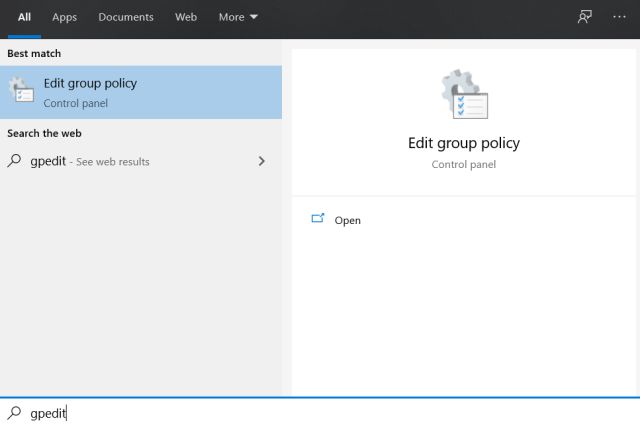
=> Once installation completed, Restart your PC once and then check whether you can able to find the Group policy editor from  start menu (Press windows key once and type " gpedit "  you can find the application in the list.


This is how you can get Group policy Editor in your Windows Home edition. Let us know your views in comments or in our social handles.


That's for it guys, You can find our social handles in post page and in home page as well, join in our groups and never miss our articles.

 Here's how you can Disable Updates Permanently for Win 10/11 :


Windows is one of the widely used operating systems among PCs and Its latest release is Windows 11 which is more advanced refreshed version to it's previous Windows 10 version. Whenever windows announce general updated to it's users in many cases after several testings also many users may face lot of issues due to these updates. Many people wish to stop the updates and also try to avoid those update notice notifications, For those who didn't want these updates we will help you out in disabling updates.

Disable Updates through Settings 

=> Open Start Menu and go to Update and Security option


=> From here you can see an option "Pause updates for 7 days".


=> Then you can go to Advanced options in menu, there you can see an option as Pause / Defer Updates. You can pause update notifications up to 35 days with this particular option. All you need to do is just move the date after 35 days.


This is one of the ways you can pause updated for your Windows 10 and 11 PCs, We got more processes as well, check them out.

Disable through Update Services :

=> Open RUN with Win+R, Type Services.msc and then click ok


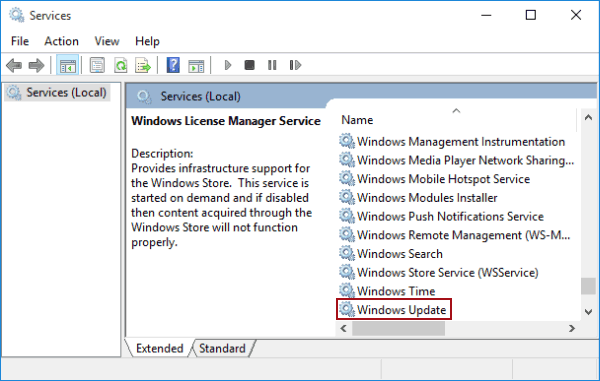
=> In Services section, go to Windows Update and double-click to open it.


=> Now, you get the pop up of the Windows Update Properties page and all you have to do is go for the Startup Type option. Tap on the drop-down menu and select the Disabled option. After that, click on “Stop.”


You can do this with this step if you want another alternative, You have us, just go to below steps then


Prevent Updates with Metered connection settings

 By this step you can able to stop downloading updates. So, that you can avoid updates as well

=> Open Settings and navigate to Network & Internet


=> Click on Properties option under the connection you have connected


=> In Properties you can find the option "Set as Metered Connection" enable the same and you're done.


By doing this changes to these settings you may prevent all general and feature update and good thing in this is you'll get security updates only, which is good.

Still you want another alternative ?? okay then we will give you another way follow steps :

Prevent Updates with Registry Editor :

If you want to stop windows updates Permanently go through the steps

=> Open Registry with regidit  typed in Run prompt by pressing win+R


=> Copy this path "Computer\HKEY_LOCAL_MACHINE\SOFTWARE\Policies\Microsoft\Windows" on address bar or navigate to this path

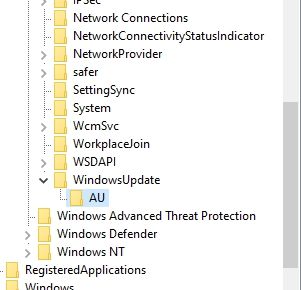
=> After navigated there Right click on Windows, Choose New and then Key.


=> Rename the new entry as WindowsUpdate.


=> Now right click on that and Select New and then Key


=> Rename that key as AU


=> Now Right click on that key and select New and DWORD (32-bit) Value


=> Rename that as NoAutoUpdate


=> Open it by clicking on it and change the value data to 1, and then Press OK


Now close the registry editor completely and then restart your PC, After restart check your PC whether the updates are completely stopped.

Still you need another alternative, Don't worry we got your back

Disable Updates with Group Policy Editor 

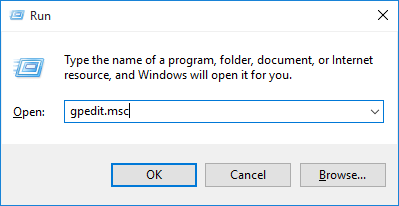
=> Search for gpedit in the search bar. After that, open “Edit Group Policy.” Please mind that, Group Policy Editor is only available to Pro & Enterprise users.


=> Here, under Computer Configuration, go to Administrative Templates -> Windows Components -> Windows Update.


=> Check clearly for Configure Automatic Updates and open it by clicking on it.


=> select Disabled and then click on the “Apply” and “OK” buttons.


Now updations are stopped forever, in any moment of time you want to update then, go to settings >> update & Security. There you can download and install but system won't ask you to install an update.


That's it for the story guys, if you have any word for us kindly share with us. If you want another alternative to above process try any third party tools but using above steps may clear your issue for sure.


Older Posts

Subscribe To

Posts
Atom
Posts
All Comments
Atom
All Comments

Follow us on

Popular Posts

  • IOS 15 : All you need to know about Apple Mobiles New Operating System
      A s we all know that IOS is the exclusive operating system developed by and used by Apple Mobiles  now as per the annual update we have IO...
  • Process to get Early Access to Task Mate app in India
      Here is how to get Access to Task Mate app : All you need to know about Task Mate app in India      As per reported information Task Mate ...
  • Hidden Features, Tips and Tricks of Facebook
       Hidden Features Of Facebook You Must Know   Facebook: is the social media platform everyone uses, but just don’t lay behind in social med...

Labels

Android (3) Android app (6) Color OS (2) Early-Access (1) Funtouch OS (1) Gadgets (2) Harmony OS (1) How to Guide (8) IOS (4) IOS app (4) MI UI (1) New Releases (10) One UI (2) Oxygen OS (1) Rumoured (3) Tech News (12) Updated Notes (4) Windows 10 (4) Windows 11 (6)

recent posts

Blog Archive

  • ▼  2022 (66)
    • ▼  February (29)
      • Feb 12 (1)
      • Feb 11 (1)
      • Feb 10 (2)
      • Feb 09 (5)
      • Feb 08 (2)
      • Feb 07 (2)
      • Feb 06 (2)
      • Feb 05 (2)
      • Feb 04 (1)
      • Feb 03 (1)
      • Feb 02 (4)
      • Feb 01 (6)
    • ►  January (37)
      • Jan 31 (3)
      • Jan 30 (2)
      • Jan 29 (4)
      • Jan 28 (4)
      • Jan 27 (11)
      • Jan 26 (5)
      • Jan 25 (8)

Created with by TechEra