• Home
  • Mobile
    • OS
      • Android
      • Apple IOS
      • One UI (Samsung)
      • Color OS (OPPO)
      • Funtouch OS (Vivo)
      • MI UI (Xiaomi)
      • Harmony OS (Huawei)
      • Oxygen OS (Oneplus)
    • New Releases
    • Gadgets
    • Rumoured
    • Update Notes
  • PC
    • Windows 10
    • Windows 11
  • Tech News
  • Apps
    • Android
    • IOS
    • Early Access
  • How to Guide
  • More
    • About us
    • Contact us
    • Privacy Policy
    • DMCA
*Welcome Everyone please note that out site has been moved to the New link with dedicated domain you can navigate Click Here to access our site all content will be found there and new content is being posted there as well.
*Click Here to go to New Site

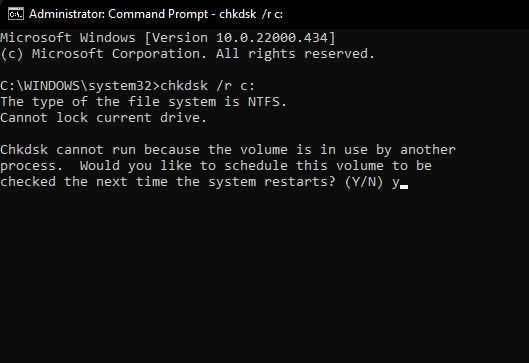
 Here is how you can Factory Reset iPad :


Many of us aware of Apple products and iPad is among them which is a Tab from Apple, It is a very powerful and capable device. This Product also runs on Apples own OS, If you need to reset your iPad by any reason, Whether it’s because you’re trading in your iPad, or simply because of some unresolvable issue with it. Here is how you can factory reset your iPad easily. You can get many methods in detailed.

Once you perform Factory Reset all your Settings, Including data which means photos, videos, Applications etc.... Everything will be lost and you device looks as Fresh new device.

Prepare your device for Factory Reset

If you are doing factory reset, you may need to backup all your data before doing it. Once you do factory reset you may loose all your day which you may can't get it back unless you have back up.

Turn off Find My on the iPad

If you’re using your computer to factory reset your iPad, you will need to turn off the Find My service before you can proceed. This is easy to do. Just follow along:

=> Open the Settings app on your iPad.


=> Tap on your name at the top left and a list will open up. Tap Find My to open its settings then open Find my iPad


=> Toggle off Find my iPad and enter your Apple ID password for verification.


Find My has been turned off now.

Update to the Latest Version of OS and iTunes :

If you’re using any device make sure your OS has been updated to the latest version. we are about to use iTunes for this guide, Mac users with macOS Catalina or later can use Finder for this same process. Mac users who cannot update to the latest version can update their iTunes using the built-in App Store. Windows users can either download iTunes from the Microsoft Store or from Apple’s Website. Once you’re all set let's go
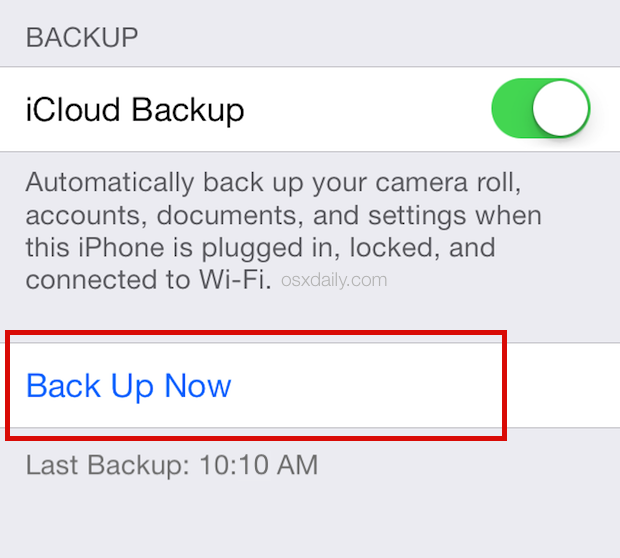
Make an iPad Backup

If you want your data backup in your iPad see the steps below :

=> Open the Settings app on the iPad


=> Tap your name and then tap iCloud


=> From the list that appears, tap iCloud Backup


=> Tap the Back Up Now button. Then your done.

How to Factory Reset an iPad with a Computer

For the iPad’s factory reset, This method involves the use of a computer. If you’re trying to reset your iPad with a forgotten passcode or it has been disabled, you can try this method. If you don’t want to go through this trouble, simply skip this section :

=> Connect your iPad to your PC or Mac.

=> Open iTunes or Finder depending on your method.

=> If you see any messages asking you to enter your passcode or any permissions, simply follow them.

=> You will now need to select your iPad in order to factory reset it.

Factory Reset iPad Using iTunes (For Macs Older than macOS Catalina)

Once your iPad is connected to iTunes you will see it on the upper-left corner of the iTunes window. You will need to click on it to access it and perform a factory reset. If cannot see a device, try reconnecting it or updating your OS and iTunes.


Factory Reset iPad Using Finder (macOS Catalina and Later)

MacOS Catalina or later users having Finder can find their devices in the sidebar of the app. Simply click it to proceed further.


=>  Once selected, you will see all the details regarding your iPad along with the OS version. Among the options, find and tap the Restore iPad button.


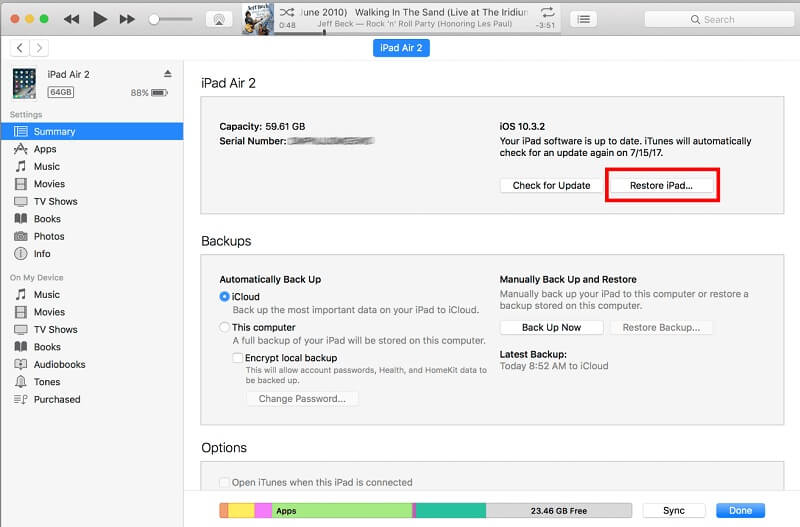
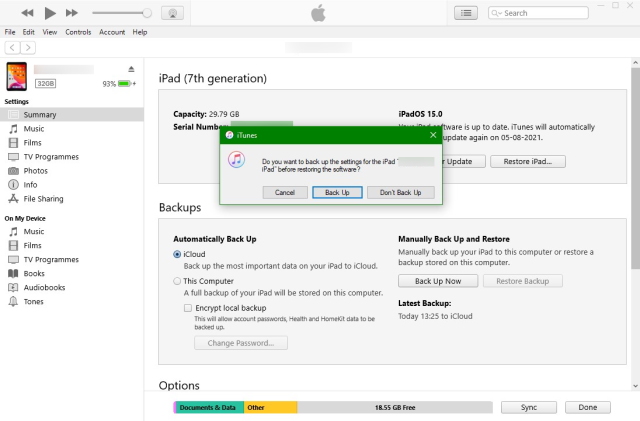
=> A dialog box will now open up asking if you want to make a backup. Depending on whether you made a backup before or simply don’t want to, choose your desired option and proceed.


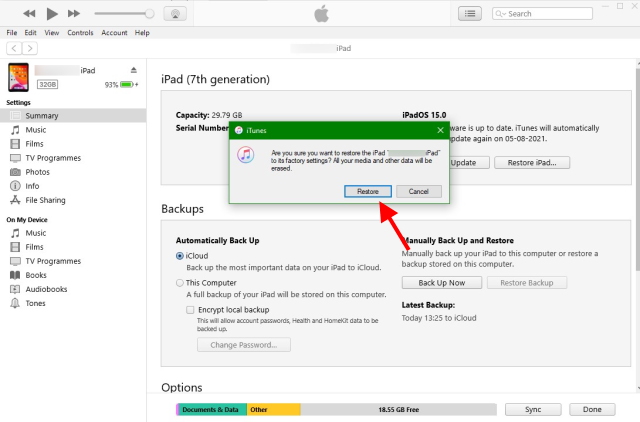
=> A confirmation box will now appear asking you if you’re sure. Click Restore to make your choice and let the factory reset begin.


Once your iPad has been factory reset, you will be met by the initial welcome screen asking you to set it up.

How to Factory Reset an iPad Without a Computer

If you want to get it done faster, The iPad settings offer a factory reset option that will easily delete all your data. However, this will only work if you know your passcode and your iPad is unlocked. For the users whose iPad is disabled, check out how to factory reset a disabled iPad.

=> Open the Settings app on your iPad


=> Find and tap General and then tap Transfer or Reset iPad


=> Here you will see some options. However, our focus is on Erase All Content and Settings


=> You’ll be met by a screen showing you some information and what data will be erased. Once ready, click Continue.


=> Enter your Passcode on this screen and proceed


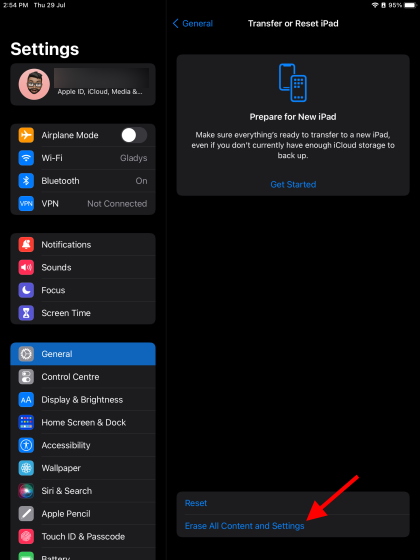
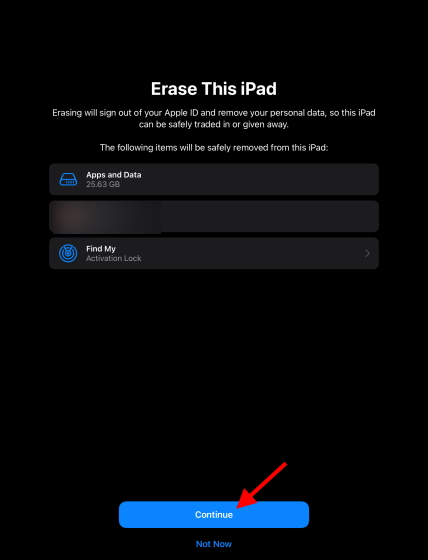
=> You’ll be met by another screen offering a backup. If you’ve already backed up your iPad, select Erase Now and let the factory reset process begin.


The iPad will now begin to reset and should be done in some time. Once through, you’ll be met with the setup screen.

Now your iPad will be looks like band new so, start setting up.


Soft Reset Your iPad Instead

If you want to Reset your iPad because it has been slowing down, hold your horses. Before you go about deleting everything, perhaps you’re better off performing a Soft Reset. If a soft reset for the iPad works, you’ll be saving yourself some time. Follow the steps below to perform a soft reset on the iPad:

=>  Depending on your iPad model, hold the power/lock button.
 => The power slider will appear titled “Slide to power off.” Swipe it to the right to power off your iPad.
=> Once the iPad has been turned off, Hold the power/lock button again until you see the Apple logo and then let go.

Your iPad has now gone through a soft reset. While there is no guarantee that this will fix all your issues, immediate ones like slowing down apps and features should resolve.

How to Force Restart an iPad

If you want to Reset your iPad for completely frozen issue and not responding, there’s a good chance the slider menu won’t open up. In that case, you need to force restart your iPad. Don’t worry as it won’t damage your data :

Method 1: For iPads with a Home Button

If your iPad has a home button, all you need to do is hold the Power and Home button down simultaneously until your iPad turns off. Once done, the iPad will restart on its own. However, if it doesn’t, repeat the process again to do so.
 
Method 2: For iPads Without a Home Button

The process to restart iPads without a Home Button is a little longer but easy nonetheless. Follow the steps below:

1. Press and release the Volume up button quickly.

2. Press and release the Volume down button quickly.

3. Press and hold the Power button until your iPad restarts.

So if find it’s not working for you, you need to be faster in pressing and releasing.


Special thanks to beebom for this article,


That's for the story guys, If you have any words for us please let us know. If you need any article you can tell us in our social media or in comments or through contact us page.


 List of devices getting one UI 4.0 update :


As we all know that Samsung has co-developed it's own custom ROM called One UI which is based on Android OS. As part of the latest update samsung is developed and launched it's latest release One UI version 4.0, Now many devices are getting this update, if you own a samsung handset let's check the list below if your devices are in the list.


Note Series :

Galaxy Note 20/5G

Galaxy Note 20 Ultra/5G

Galaxy Note 10/5G

Galaxy Note 10+/5G

Galaxy Note 10 Lite


Samsung Tab Series :


Galaxy Tab S7/5G

Galaxy Tab S7+/5G

Galaxy Tab S6 Lite

Galaxy Tab S6/5G

Galaxy Tab A7 Lite

Galaxy Tab S7 FE


Samsung Foldable Series :

Galaxy Z Fold 3 5G

Galaxy Z Flip 3 5G

Galaxy Z Fold 2/5G

Galaxy Z Flip/5G

Galaxy Fold/5G


Samsung Galaxy "A" Series :


Galaxy A71/5G

Galaxy A51/5G

Galaxy A90 5G

Galaxy A03s

Galaxy A52s 5G

Galaxy A12 Nacho

Galaxy A22/5G

Galaxy A32/5G

Galaxy A72

Galaxy A52

Galaxy A52 5G


Samsung "F" Series :

Galaxy F22

Galaxy F52 5G

Galaxy F62

Galaxy F12


Samsung Galaxy "M" Series :

Galaxy M52 5G

Galaxy M22

Galaxy M21 2021

Galaxy M32/5G

Galaxy M42 5G

Galaxy M12

Galaxy M62


Samsung Galaxy "S" Series :

Galaxy S21 5G

Galaxy S21+ 5G

Galaxy S21 Ultra 5G

Galaxy S20/5G

Galaxy S20+/5G

Galaxy S20 Ultra/5G

Galaxy S20 FE/UW/5G

Galaxy S10e

Galaxy S10

Galaxy S10+

Galaxy S10 5G

Galaxy S10 Lite

So, Here is the list of devices getting latest One UI update. If you wanna check out Latest arrival in Samsung Mobiles lineup Samsung Galaxy S22 Ultra check it out.  


That's all for the story guys, Hope you got the information required. If you have any word to say to us, Please let us know.

All you need to know about how to fix 100% Disk-Usage in Windows 11 :


As we all know that Windows has released it's Latest version after long gap after releasing it's Windows 10. Windows 11 comes with many UI changes and polish, but still there are some underlying issues that just don’t seem to leave Windows in this latest version too. Many PCs won't Support this Version as it is High end version we need  decent specs along with higher TPM version but Thanks to beebom, i have managed to install it on my PC and used the same which is an awesome update. Now, Many users reported and i also observed random spikes in disk usage in Windows 11, with 100% disk usage even PC is idle. 

I have solved my issue and as per my research i have gathered all the possible solutions to resolve the problem, these ways will help you to bring down the high disk usage in Windows 11.


Following ways are the most effective methods to fix the 100% disk usage problem. Let's Dive in


1. Disable Background Apps

First things first, Check all the applications which are Running in background and Disable the apps which can we do so. There will be a high chances of background apps might be one of the reasons you are seeing 100% disk usage on computer. 

Here is how you can do that :

=>  Open Windows Settings using the “Windows + I” keyboard shortcut and move to “Accounts” section from the left pane. Here, select “Sign-in options“.


=> Now, disable “Automatically save my restartable apps and restart them when I sign back in” option on the next page.

=> Next, go to the “Apps” section and click on “Apps and Features” on the right pane.


=> Now you have a list of apps installed on your PC. Click the three-dot menu icon next to the apps you want to disable from running in the background.

=> Select “Advanced options” from the menu from 3 dots and scroll down to get to the “Background apps permissions” option. Select “Never” from the drop-down menu here to prevent the app from running in the background and avoid unnecessary disk usage. Do this for all the apps which you don’t want to run in the background.


From this Process you can release many Resources which are in use. So, that your PC may work efficiently.

2, Perform a System Scan 

If you still see a spike in disk usage, even after following all the steps above, I would suggest performing a system scan to look for malware or hidden rootkits. Sometimes, sophisticated malware hides behind the system folders and performs all sorts of actions, including crypto mining and malicious encryption. In such cases, it becomes necessary to look for the trojan horse and eliminate it to reduce your disk usage from 100% in Windows 11. You must check the list of best malware removal tools for Windows 11, Perform a deep scan on your PC, If the antivirus finds anything suspicious, remove it and check if disk usage has gone down.

3, Run Disk Check from CMD

Sometimes, due to logical errors, disk may unable to complete a given operation, and it continues to use the disk abnormally by attempting to execute the action. And this may leads to 100% spikes in disk usage on Windows 11 PCs. So we suggest you to run Disk Check to resolve the issue.

=>  Press the Windows key once and type “cmd”. Run cmd with admin privileges.


=> Once you opened CMD with admin rights, run this command (chkdsk /r c: ). It will ask whether you want to perform a disk check the next time your PC restarts. Type Y and hit Enter. Now, restart your PC, and PC will check for all the bad sectors and logical errors and will fix them along the way. Once the computer boots, the high disk utilization issue will be gone in many cases.


This Process may clear your issue, if not navigate to below.

4, Disable Windows Search

Windows Search is one of the prime suspect behind this, Disabling the Windows Search may clear the issue for the most users, but note that it will also affect files and folders search on your PC. So if you are not comfortable disabling this service, we suggest you skip this Step and move to the next.

1. Open Run window using the “Windows + R” keyboard shortcut and execute services.msc .


=> After opening another window, look for “Windows Search” and double-click to open it. In the pop-up window, set the Startup type to “Disabled” and stop the service instantly. After that, click on Apply and then OK and restart the PC.


This Process solved many users issue.

5, Disable Superfetch Service

Now Superfetch is also know as SysMain, it is a service used by Win 11/ 10 to preload apps into memory before you launch it. Microsoft has brought this feature to launch programs as quickly as possible. However, due to this feature, the disk usage sometimes gets high, as it’s engaged all the time while loading the program from disk to memory. As per some users reports, it seems the major reason behind 100% disk usage. So to fix the high disk usage in Windows 11, we need to disable the SysMain service. Here are the steps you need to follow. disabling the service will marginally slow down app opening time

=> First, use keyboard shortcut “Windows + R” to open the Run prompt. type services.msc 


=> Now, look for “SysMain” or “Superfetch”. and open its properties window.


=> Change the Startup type to “Disabled” and click on “Stop” to immediately halt the service. Then, click on Apply and OK.


After doing this check disk usage once, check after restart as well.

6, Disable Scheduled Defragmentation

As an Windows user from very long time, Many of us know that OS periodically conducts defragmentation of the hard disk to improve performance. While performing this it increases the disk usage to 100%, So to disable the scheduled defragmentation on Windows 11, go on below

=> Press the Windows key once and search for “defragment“. 


=>  Now, open “Defragment and Optimize Drives”. Next, click on “Change settings“.


=> Untick the “Run on a schedule (recommended)” checkbox and click on “OK”. This will disable scheduled defragmentation on your PC, 


This should reduce disk usage and prevent it from going up to 100% randomly.

7, Disable Startup Apps

Startup apps are the applications or programs that automatically start running in the background when you start your PC. These apps may consume disk usage and slow down your PC whether you use them or not but they keep running in background. Keep a check on what programs you allow to start up when you switch on your computer and disable the unnecessary ones right away. Here is how to do that here:

=> Use the Windows 11 keyboard shortcut “Ctrl + Shift + Esc” to open the Task Manager.


=> After that, move to the “Startup” tab and check out all the apps. If you see an app that you don’t use during startup and has the “Enabled” select that app next to it, then right-click on it and disable it.


This may solve your issue or else go to next steps and while installing application you may be prompted to select to start the app with startup you can disable from there itself if you really don't want that particular app starting from system start up.

8, Reset Virtual Memory

If your PC got short of RAM, it sometimes utilizes the hard disk memory as a swap to hold programs and files in memory. in some cases PC takes up major disk space, which could increase the disk usage considerably. To avoid such a scenario, we can reset virtual memory or increase it, so that the OS does not keep the hard disk engaged all the time.

=> Open the Run window using the “Windows + R”, input sysdm.cpl. It will open the “System Properties” window directly.


=> Now, Move to the “Advanced” tab and click on “Settings” under Performance.


=> Under “Performance Options” window, move to the “Advanced” tab and click on “Change”


=> Untick the “Automatically manage paging file size for all drives” option's checkbox and choose “Custom size“


=> Now, enter the “Recommended” size (mentioned in the screenshot) into the Initial size field. And in the Maximum size field, enter the amount (in MB) 1.5x times your RAM size. For example, Your RAM is 8GB, so I have entered 1024 x 8 x 1.5 = 12288. Finally, click Set -> OK. Now, restart your PC, Done.


Now your issue may resolved, if not yet go through the next process steps

9, Disable Connected User Experiences and Telemetry

Connected User Experiences and Telemetry is another service by Microsoft that runs under svchost.exe and there is a chance of high disk usage. It basically tracks diagnostic data and sends it to Microsoft’s servers. So to disable it, follow steps below.

=> Open the Run prompt by pressing the “Windows + R” shortcut. Here, type services.msc and enter


=> There, Under the Services window, look for “Connected User Experiences and Telemetry” and open it. Then, set the Startup type to “Disabled” and stop the service right away. Click Apply then OK to save the changes.


=> Many Techies also suggest to disable the “Connected Devices Platform Service” as well. by changing the Startup type to “Disabled” and stop the service. Disabling both of these services should significantly bring down disk usage.


10, Disable MSI Mode

Microsoft reported that, in some cases, high disk usage actually stems from Advanced Host Controller Interface PCI-Express (AHCI PCIe) controllers that have firmware incompatibility. If your PC is using the “StorAHCI.sys” driver, you are most likely affected by this issue. Microsoft further states that if Message Signaled Interrupt (MSI) mode is disabled, disk usage can be reduced drastically. here is the steps below on how to disable the MSI mode, Thanks to beebom for this steps :

=> First, use the “Windows + X” shortcut to access the Quick Links menu and open Device Manager.


=> Expand “IDE ATA/ATAPI controllers” and right-click on the entry. Now, select “Properties” from the menu.


=> From the Properties pop-up window, move to the “Driver” tab and click on “Driver Details“.


=> If you find “StorAHCI.sys” under the path, proceed to the next step. In case a different driver name appears on your PC, you don’t need to proceed ahead. This solution is not for you and won’t help you solve the 100% disk usage issue.


=> Next, go to the “Details” tab and change the Property to “Device instance path” from the drop-down menu. Now, right-click on the “Value” here and copy it.


=> Paste the Value into a Notepad file as we will need it ahead.


=> Now, close the Device Manager and open the Registry Editor. Press the Windows key and search for “registry“.


=> After that, move to the below path in the Registry Editor.

Computer\HKEY_LOCAL_MACHINE\System\CurrentControlSet\Enum\PCI\

=> Now, match the entry with the one you pasted in the Notepad file and expand it.


=> Further, move to Device Parameters -> Interrupt Management -> MessageSignaledInterruptProperties.


=> On the right pane, look for “MSISupported“. Open it and change the value data to 0.


=> Close the Registry Editor and restart your PC. Now onwards, you will find that your disk utilization does not go above the 10-20% mark.

11, Update Windows 11 or Perform a Clean Install

You should try updating Windows 11 to the latest version if it is not in latest version. Use the “Windows + I” shortcut to open Windows Settings, move to “Windows Update” from the left pane, and click on “Check for Updates”. Download and install all the pending updates and restart your PC. After that leave your PC idle for an hour after the update so that it applies all the changes.

In case it does not work, you need to perform a clean install of Windows 11. Don’t worry, none of your files from other drives will be erased, except for the C drive, so remember to back up all your valuable files. This method will most certainly fix the issue.

12, Update Storage Drivers

Due to faulty storage drivers, the disk can be stuck in a memory loop and may perform an action repeatedly. It can increase disk usage and cause your Windows 11 PC to slow down. To solve this issue, you should try updating the storage drivers to the latest version. And here’s how you can do that:

=> Press the “Windows + X” and open the Quick Links menu and open “Device Manager“.

=> Expand the “Disk drives” section and right-click on your disk. From the menu, click on “Update driver“.


=> From the pop-up window that now appears, click “Search automatically for drivers“. If there is a new update available for your disk drive, Windows 11 will install it and ask you to restart the PC.


Once if you tried all these you may fix the issue of 100% disk utility.


That's for the story guys, Hope you got the information useful. If you have any word about us kindly let us know.


Newer Posts
Older Posts

Subscribe To

Posts
Atom
Posts
All Comments
Atom
All Comments

Follow us on

Popular Posts

  • IOS 15 : All you need to know about Apple Mobiles New Operating System
      A s we all know that IOS is the exclusive operating system developed by and used by Apple Mobiles  now as per the annual update we have IO...
  • Process to get Early Access to Task Mate app in India
      Here is how to get Access to Task Mate app : All you need to know about Task Mate app in India      As per reported information Task Mate ...
  • Hidden Features, Tips and Tricks of Facebook
       Hidden Features Of Facebook You Must Know   Facebook: is the social media platform everyone uses, but just don’t lay behind in social med...

Labels

Android (3) Android app (6) Color OS (2) Early-Access (1) Funtouch OS (1) Gadgets (2) Harmony OS (1) How to Guide (8) IOS (4) IOS app (4) MI UI (1) New Releases (10) One UI (2) Oxygen OS (1) Rumoured (3) Tech News (12) Updated Notes (4) Windows 10 (4) Windows 11 (6)

recent posts

Blog Archive

  • ▼  2022 (66)
    • ►  February (29)
      • Feb 12 (1)
      • Feb 11 (1)
      • Feb 10 (2)
      • Feb 09 (5)
      • Feb 08 (2)
      • Feb 07 (2)
      • Feb 06 (2)
      • Feb 05 (2)
      • Feb 04 (1)
      • Feb 03 (1)
      • Feb 02 (4)
      • Feb 01 (6)
    • ▼  January (37)
      • Jan 31 (3)
      • Jan 30 (2)
      • Jan 29 (4)
      • Jan 28 (4)
      • Jan 27 (11)
      • Jan 26 (5)
      • Jan 25 (8)

Created with by TechEra