• Home
  • Mobile
    • OS
      • Android
      • Apple IOS
      • One UI (Samsung)
      • Color OS (OPPO)
      • Funtouch OS (Vivo)
      • MI UI (Xiaomi)
      • Harmony OS (Huawei)
      • Oxygen OS (Oneplus)
    • New Releases
    • Gadgets
    • Rumoured
    • Update Notes
  • PC
    • Windows 10
    • Windows 11
  • Tech News
  • Apps
    • Android
    • IOS
    • Early Access
  • How to Guide
  • More
    • About us
    • Contact us
    • Privacy Policy
    • DMCA
*Welcome Everyone please note that out site has been moved to the New link with dedicated domain you can navigate Click Here to access our site all content will be found there and new content is being posted there as well.
*Click Here to go to New Site

Here's how you can use Visual Search in Edge Browser :


As we all know that Microsoft had developed it's Own web browser based on Chromium open source code instead of their Internet Explorer where replaced the same as well. After launching the application to public till now Microsoft pushed many updates to the app and in the same line now Microsoft is planning to include anther feature into the application which is Bing’s visual search. Apart from the ability to search images through an option in the right-click context menu, there’s now also a dedicated visual search button that appears when you hover over images. We already know that google already integrated their Lens into Google chrome like wise Microsoft integrated their visual search option in edge browser. Let us see how you can get that feature in the Microsoft Edge browser. 

Microsoft's Visual Search :

Visual search is a Microsoft's feature that lets you look up images from websites on Microsoft’s search engine Bing, Which can be used in Edge browser. The feature will come in handy for anyone who frequently searches images for the source or looking for similar images, it is merged with edge browser long back but it can be accessed through using bing search engine. Microsoft has been testing the Visual Search feature since Edge 96, Now it is enabled it by default with Edge 99. Here's how you can enable it.


Process to Enable the feature :

=> Open Edge browser and go to settings by clicking on three dots on the top right side


=> Navigate to Appearance tab Click on Visual Search option under Context menu options :


=> Enable “Show visual search in the context menu” and “Show visual search on image hover” switches. Now you can get the option to hover over any image to search it on Bing.


This is how you can enable the visual search in Microsoft Edge browser and you can also disable the same from the process by disabling those 2 options in above screenshot.


Disable for Specific Websites in Microsoft Edge :


If you don't want to use this visual search on some websites you can block those specific websites. So that you won't get this feature on that particular websites. Here is how you can do that

=> Open Edge browser and go to settings by clicking on three dots on the top right side


=> Navigate to Appearance tab Click on Visual Search option under Context menu options :


=> Click on the “Add” button next to the “Visual search is turned off for these sites” option.


=> Now type or paste the URL of the website you would like to disable visual search on. After entering the URL, click the “Add” button, and you are all set. The browser will no longer show the visual search button on this specific website.


=> If you want to use this feature again on blocked site, click on the trash icon next to website’s name to make Visual Search functional on that website.


This is how you can Exempt a specific website to avoid using the feature and how you can delete the same from list and personally we advice you to turn this off this feature for your back up or cloud storage sites which will avoid searching your personal pics accidentally.


Here's how you can enable Group Policy editor in Windows 10 / 11 :


As we all know about Microsoft Windows Operating System some of us didn't know that windows system have different version which they named like Windows Home, Windows Pro, Windows Enterprise editions. Home version can be used by students and general users and Pro versions used by Professionals where as Enterprise edition will be used by Enterprises. Main difference between these are some options and features will be disabled in some versions. In the same way Group Policy Editor was disabled system wide in Windows Home editions. So, by using simple batch file and configuring it we can get the same on our Home edition of windows for free. Let's get into details now :


=> First of all as we said above we need to download a batch file which is created by MajorGeeks. You can get this by clicking here

=> Once you downloaded the file now right click on that file and run the file with Admin privileges.


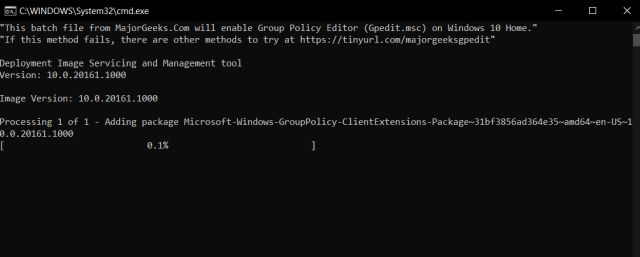
=> Once you the Run the batch file you will find a CMD file installing the features which will take up to 5 minutes or less.


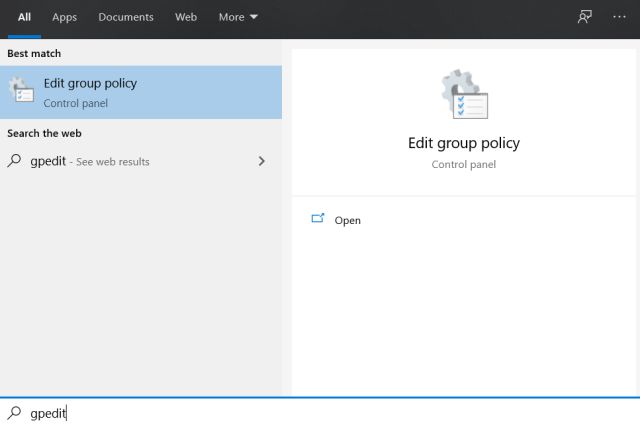
=> Once installation completed, Restart your PC once and then check whether you can able to find the Group policy editor from  start menu (Press windows key once and type " gpedit "  you can find the application in the list.


This is how you can get Group policy Editor in your Windows Home edition. Let us know your views in comments or in our social handles.


That's for it guys, You can find our social handles in post page and in home page as well, join in our groups and never miss our articles.

Disabling or Enabling "Windows Defender" in Windows 11 :


Users who are using Windows 10 must be well aware about windows security suit which protect users from basic viruses "Windows Defender", Microsoft shipping Defender bundled with Windows Operating system from long time actually. Ofcourse windows defender upgraded a lot from it's initial version.
Putting aside about security that windows defender gives, User whose RAM is less always have issue with defender because it consumes a lot of memory space in windows due it's security protocol the app must run real time security scan frequently so high amount memory must be consumed. So, many user wanted to get rid of it.  If you also one of them let's get into details now :

Disable Windows Defender in Windows 11 :


We are proposing 3 different ways to Disable Let's see below one by one

Disable from Settings :

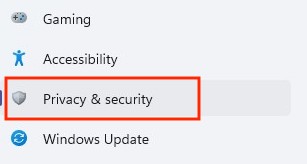
=> Open the Settings and go to the “Privacy & security” tab. Under the “Security” section, click on “Windows Security”.


=> Now, click on “Open Windows Security”. Your Windows 11 PC will open the Windows Security app in a new window.


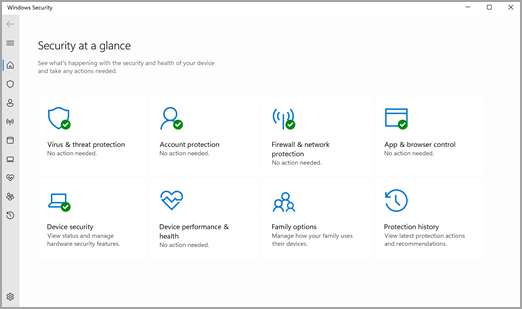
=> You can see Windows Security’s home screen. Here, click on the “Virus & threat protection” option.


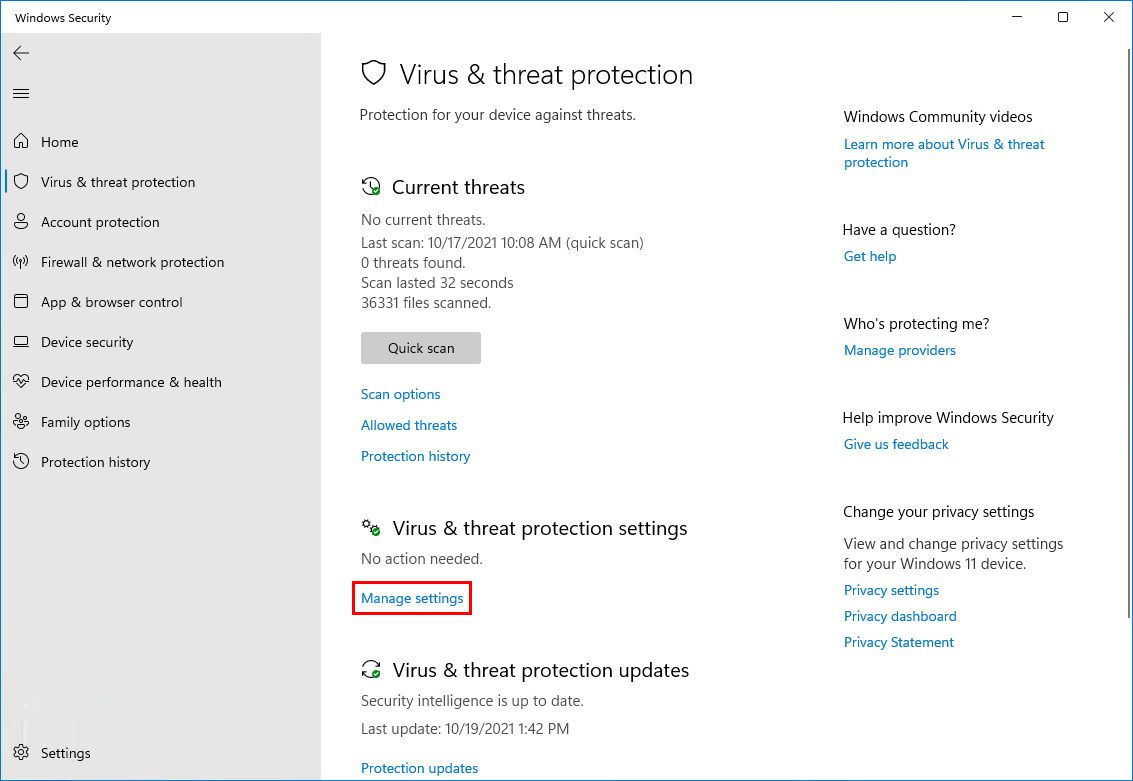
=> Under the “Virus & threat protection settings” section, click on “Manage settings” to change the settings of Defender.


=> Now you get settings to configure Defender, there disable the “Real-time protection” switch and other switches on the same page to temporarily disable Windows Defender.


With this Process Windows Defender get DIsabled but temporarily only after restart or after some time windows will re activate defender automatically as this is a security default feature from windows, you can't disable defender permanently through this. If you want to disable defender permanently see below.

Disabling through "Group Policy Editor" :

=> First of all, we should disable “Tamper Protection” from the Windows Security app. You can disable from : Windows Security >> Virus & threat protection >> Manage settings.


=> After Disabling Tamper Protection, open a Run window by pressing “Win+R” and type “gpedit.msc” to open the Group Policy Editor.


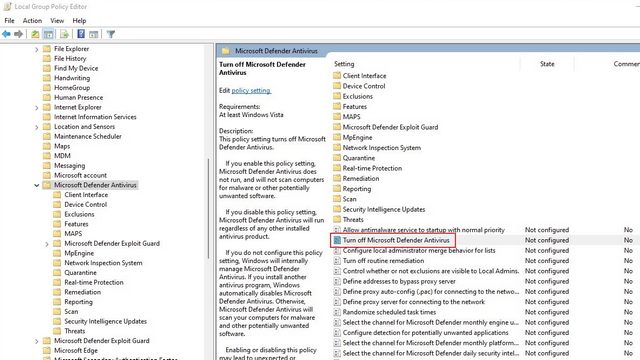
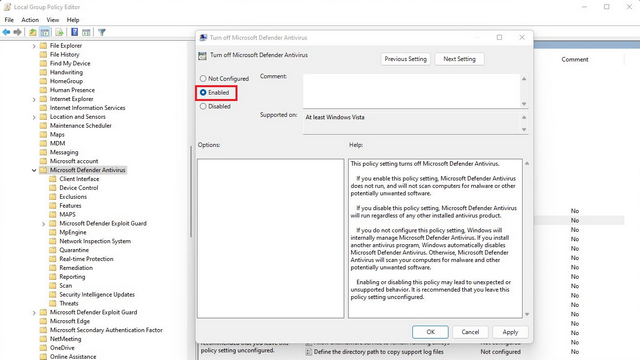
=> Navigate to " Computer Configuration > Administrative Templates > Windows Components > Microsoft Defender Antivirus " and double click on "Turn off Microsoft Defender Antivirus" which will be shown in right side of the screen.


=> In the next pop-up window, select “Enabled” and click “OK” to apply the changes. Once all done, restart your PC. After restart windows defender will no longer run on PC. To re-enable Defender through Group Policy Editor, all you need to do is just choose “Disabled” instead of Enabled and hit “OK”.


Disable through "Registry Editor" :

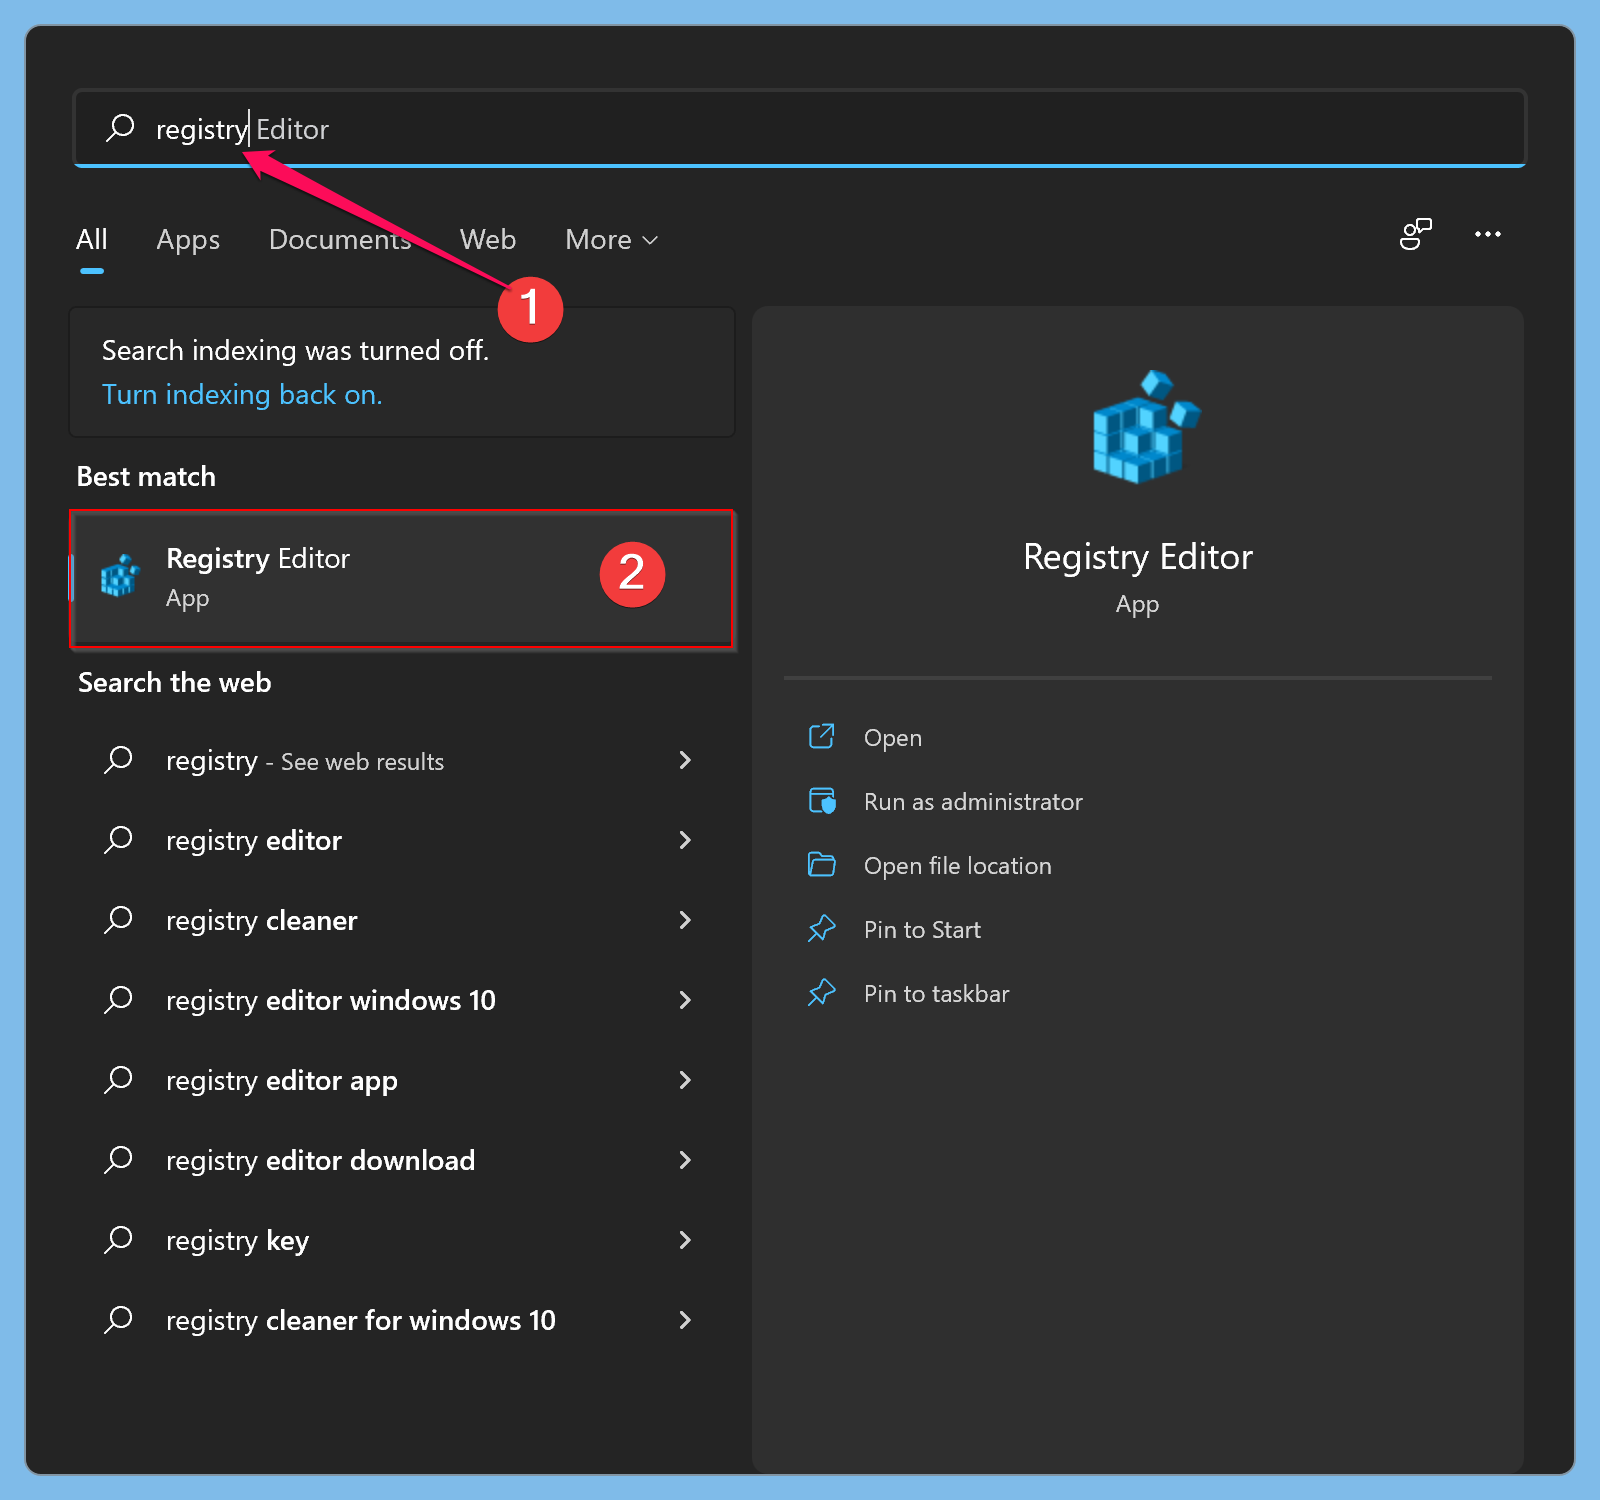
=> Press the Windows key once, type “Registry Editor”, and choose “Run as administrator” to open the program with admin privileges.


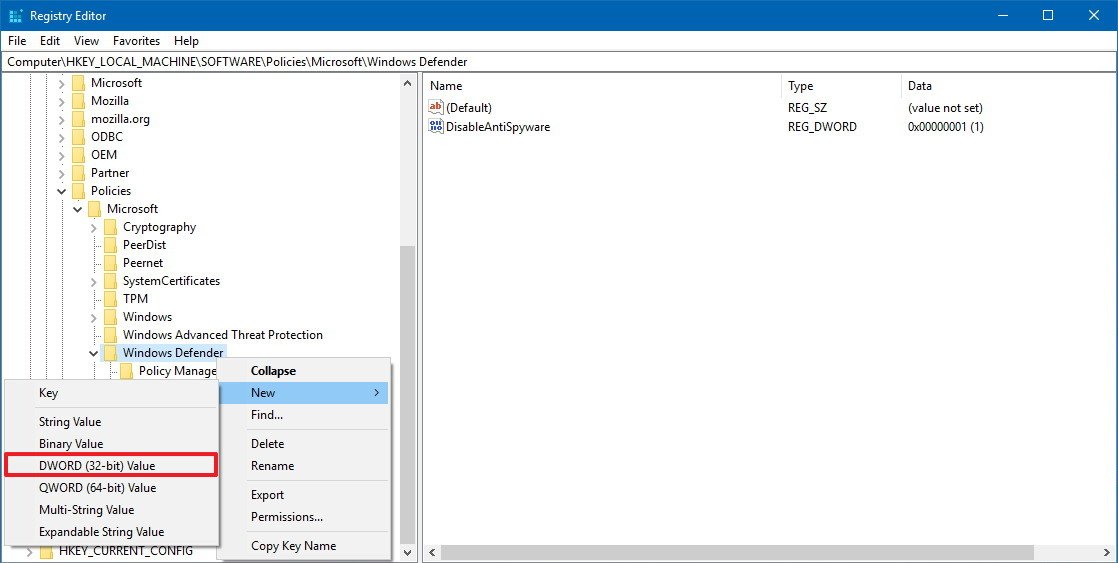
=> Now, Navigate to " HKEY_LOCAL_MACHINE\SOFTWARE\Policies\Microsoft\Windows Defender " and choose New -> DWORD (32-bit) Value. Name it as “DisableAntiSpyware”.


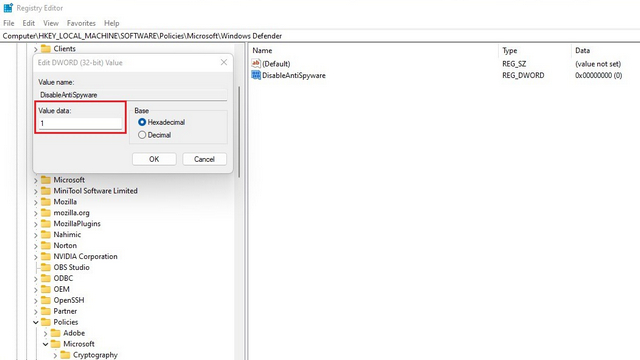
=> Double-click “DisableAntiSpyware” which we created now, and set its value data to “1”. Once you are done, press OK.


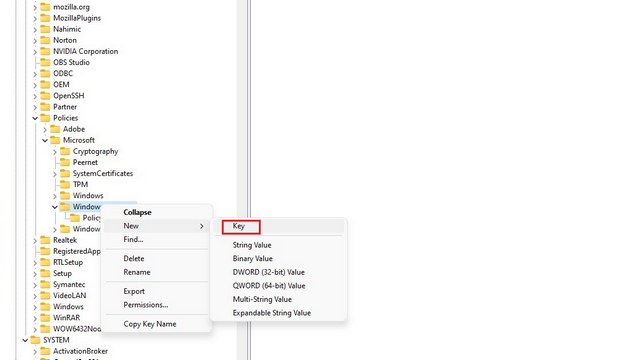
=> You can create new folders within Registry editor, all you have to do is right-click on the parent “Windows Defender” directory and choose New >> Key.


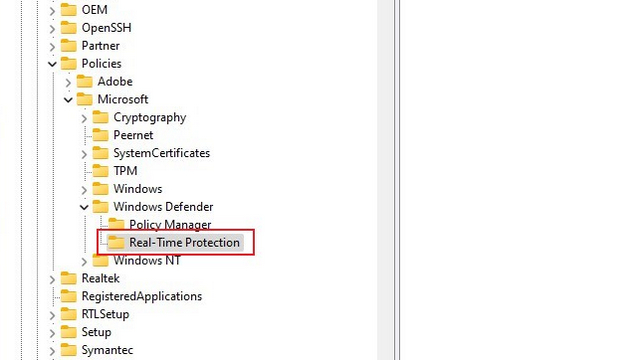
=> You can then name the key based on the path we are about give you because you need to create some folders now. 


=> Now, you know how to create folders now we will give you path, create dword file like above we did.

[HKEY_LOCAL_MACHINE\SOFTWARE\Policies\Microsoft\Windows Defender]
"DisableAntiSpyware" dword:1
"DisableRealtimeMonitoring" dword:1
"DisableAntiVirus" dword:1
"DisableSpecialRunningModes" dword:1
"DisableRoutinelyTakingAction" dword:1
"ServiceKeepAlive" dword:0

[HKEY_LOCAL_MACHINE\SOFTWARE\Policies\Microsoft\Windows Defender\Real-Time Protection]
"DisableBehaviorMonitoring" dword:1
"DisableOnAccessProtection"dword:1
"DisableScanOnRealtimeEnable" dword:1
"DisableRealtimeMonitoring" dword:1

[HKEY_LOCAL_MACHINE\SOFTWARE\Policies\Microsoft\Windows Defender\Signature Updates]
"ForceUpdateFromMU"dword:0

[HKEY_LOCAL_MACHINE\SOFTWARE\Policies\Microsoft\Windows Defender\Spynet]
"DisableBlockAtFirstSeen" dword:1
If you perform all these steps you can successfully disable windows defender permanently.

Enabling Windows Defender :

=> Open Settings app and open “Privacy & security” tab. Now, select “Windows Security” under the “Security” section.


=> Windows Security page appears, click the “Open Windows Security” button. The Windows Security app will now open.


=> Now you can see Windows Security’s home screen. Here, click on the “Virus & threat protection” section and click on “Manage settings” to re-enable Windows Defender.


=> Now, enable the “Real-time protection” switch alongside other switches on the same page to get Windows Defender’s protection back.


So, This is how you can re-enable your windows defender. If you have good RAM we recommend you keep running defender as this gives basic protection for our PCs. Incase you install any anti-virus windows will turn off defender adn make your installed Anti virus as default security suite.


That's it guys, Hope you find information well. If you have any word with us kindly let us know through comments or you can contact us through all our social handles.


Here's how to use Continue on PC Feature on Android :


We all know that Windows 10 had received many updates and many new features in recents years, Along with many new features it had developed it's EDGE browser which is based on Chromium to compatible with Google Services. In their latest release they totally discontinued their Internet Explorer and Included Edge browser.

We also know that Microsoft developed and bundled Your Phone application which lets user to connect their android mobiles to their PCs, Through out the year this application also upgraded a lot. 

Why we are discussing all this now ? we not out of the topic guys, we are actually on the topic let's get started with the Process of the application.

Actually Continue on PC is the feature you can continue browsing which share the same url to your PC from your Mobile here's how you can get on Android.


First of all You need to Connect your mobile with your PC through Your Phone Application :

=> Go to Settings on your Windows PC and then click on Phone


=> In Phone option you can see connected device along with "Add Phone" option, Click on it and it will open a dialogue box that will ask you to enter your mobile number, then it will share a link that will enable web sharing from any browser.


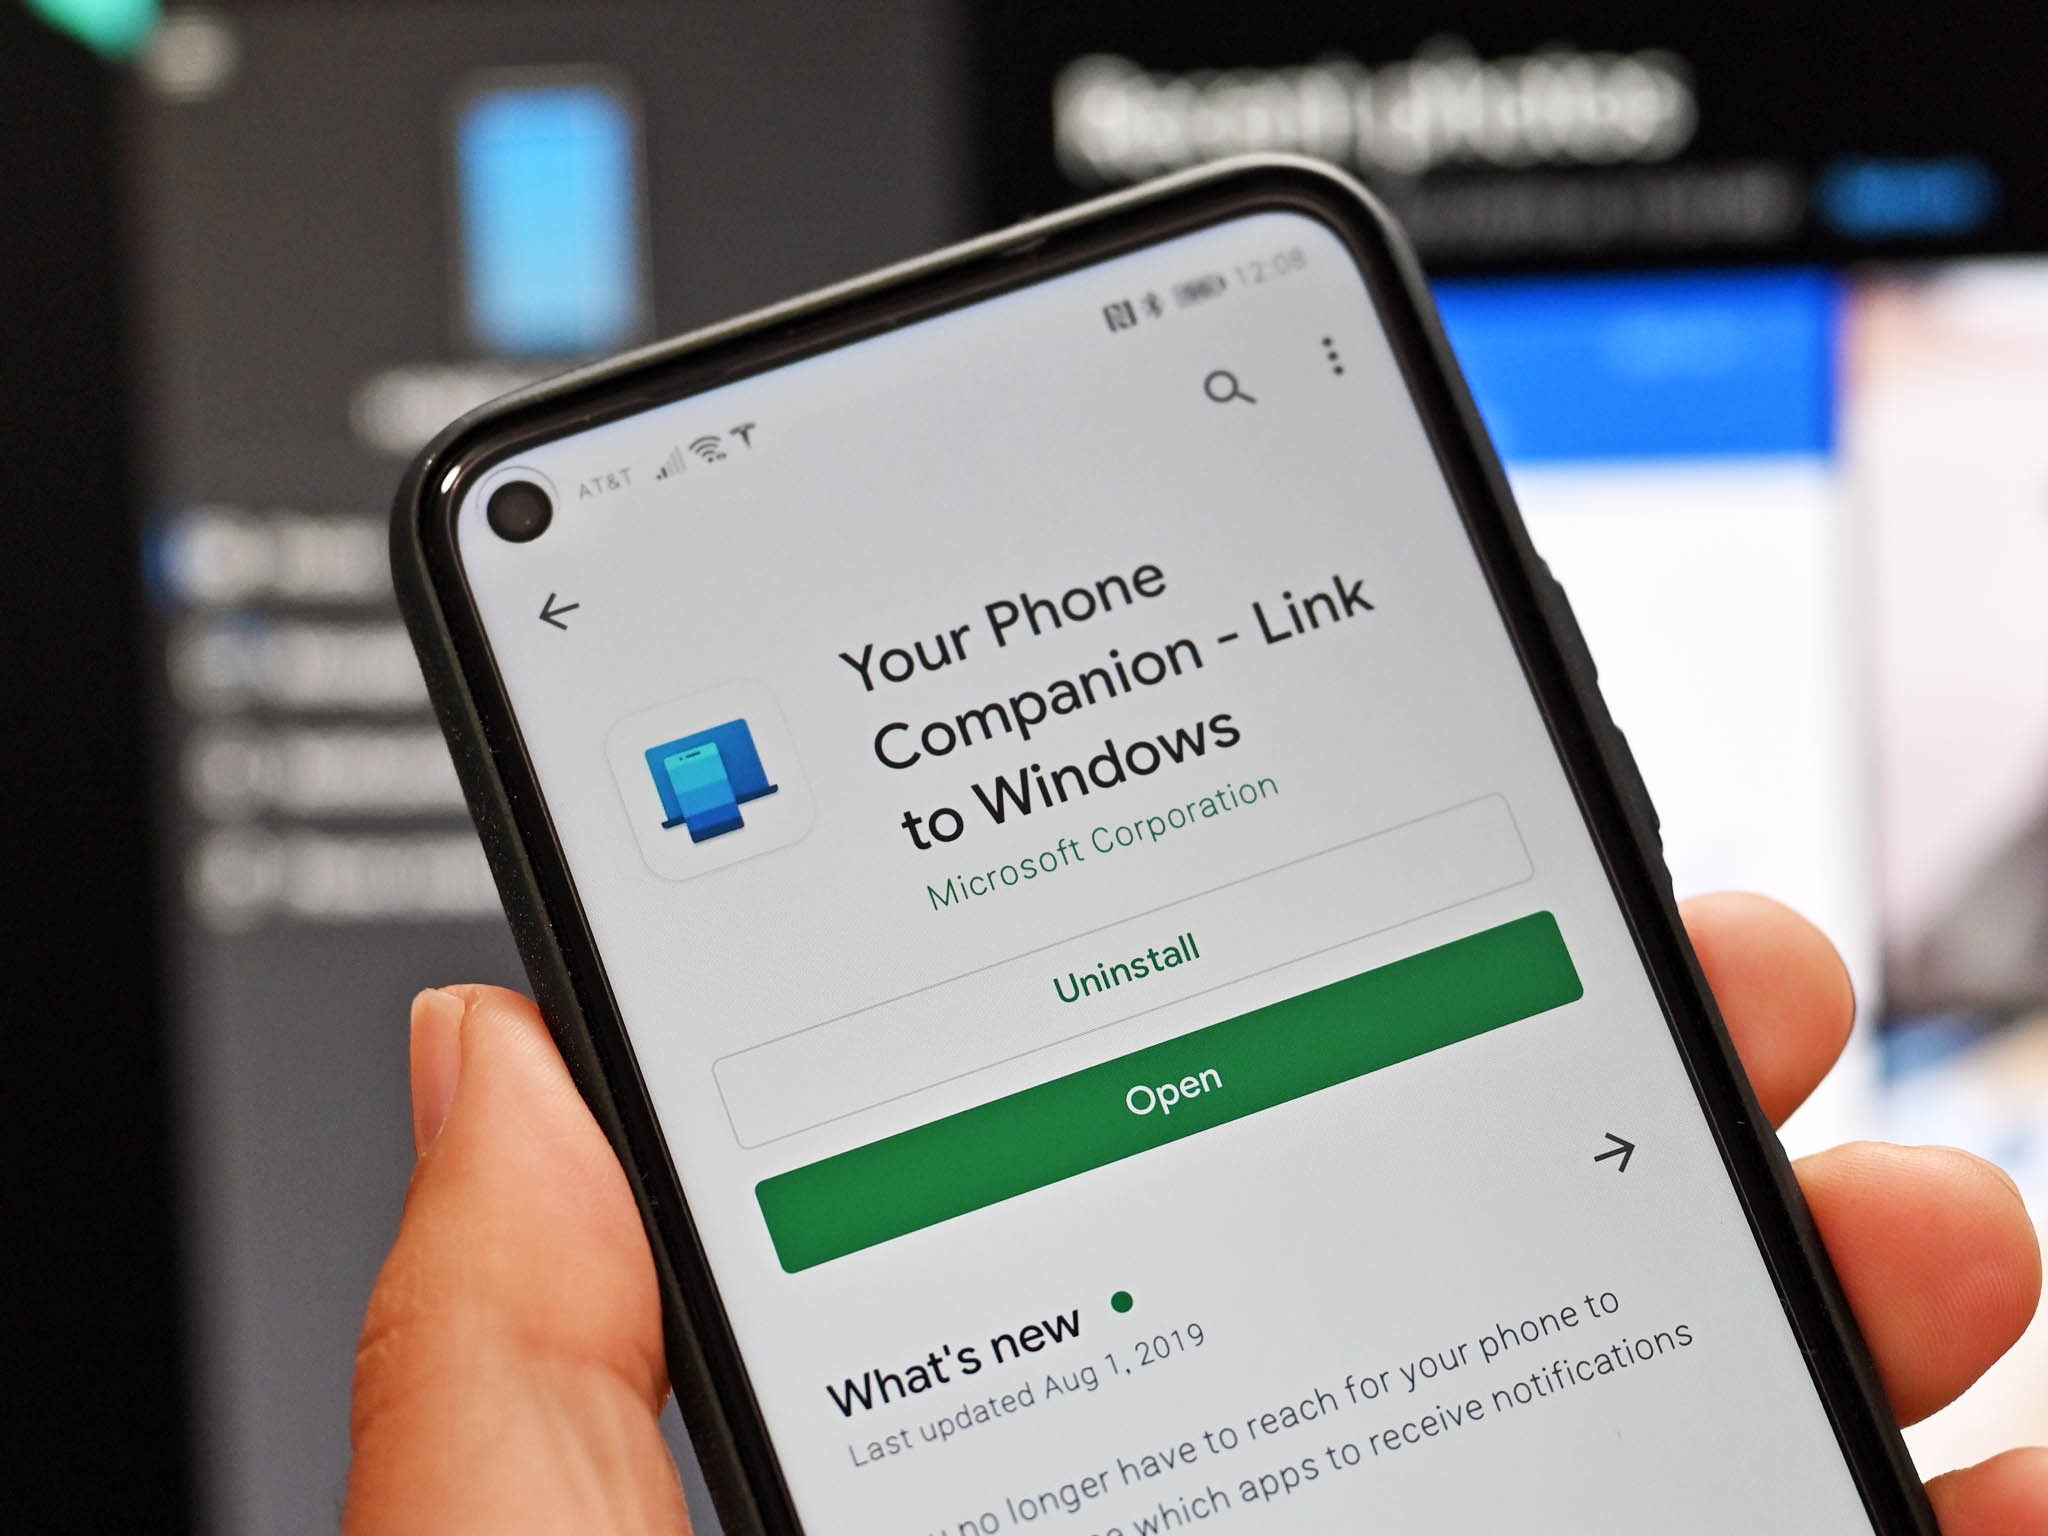
=> After you complete onscreen instruction you will link for the app to your mobile, Click on the link from the text message you received and install the Microsoft Apps application from the Play store

=> After installing the app, open Your Phone application in PC and get started with the connection process

=> Once you click open PC app click on get started 


=> Once you get started in PC, Now another screen appear so that you can select that you have app in your phone as well and you can connect with QR.


=> Now a QR code will be appeared, Scan that code with Your Phone app in your Android mobiles and follow onscreen instructions and give all the permissions required.


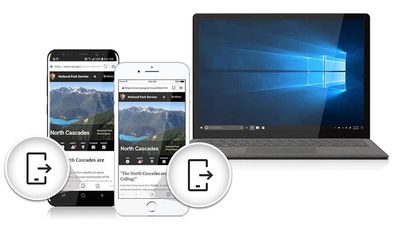
=> From Now on whenever you using any browser from share menu you can have an option which is Continue on PC or an icon like smartphone with an outward arrow, click on it.


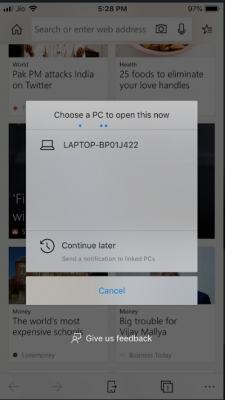
=> After selecting the option you will see a window pop up with list of computers connected, select the device you wish to share the link with, and it will open immediately on your PCs default browser.


=> As this is Microsoft's app this will be works best in Microsoft Edge browser, but you can use this with any browser in your mobile. Do check once.


That's for the day guys, Hope you got the information and if you have any word for us we have maximum all social handles which are widely used, get connected there or you can always have the comment box below.

 Here is how you can Factory Reset iPad :


Many of us aware of Apple products and iPad is among them which is a Tab from Apple, It is a very powerful and capable device. This Product also runs on Apples own OS, If you need to reset your iPad by any reason, Whether it’s because you’re trading in your iPad, or simply because of some unresolvable issue with it. Here is how you can factory reset your iPad easily. You can get many methods in detailed.
Once you perform Factory Reset all your Settings, Including data which means photos, videos, Applications etc.... Everything will be lost and you device looks as Fresh new device.

Prepare your device for Factory Reset

If you are doing factory reset, you may need to backup all your data before doing it. Once you do factory reset you may loose all your day which you may can't get it back unless you have back up.

Turn off Find My on the iPad

If you’re using your computer to factory reset your iPad, you will need to turn off the Find My service before you can proceed. This is easy to do. Just follow along:

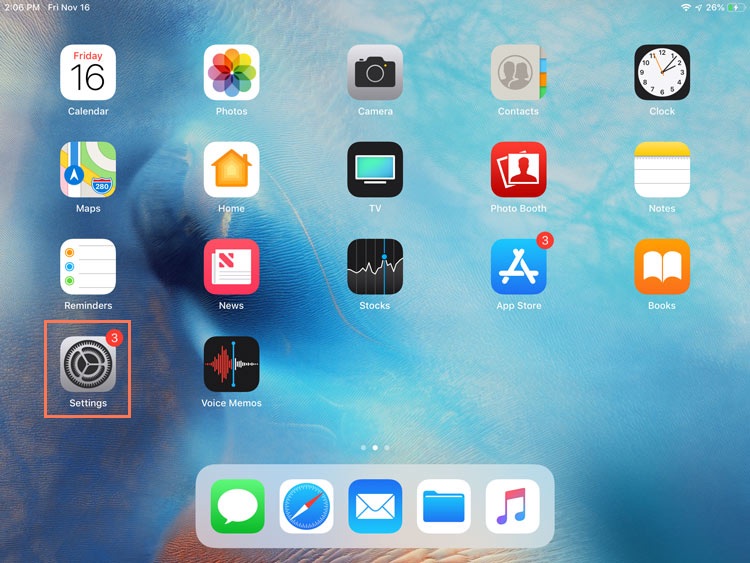
=> Open the Settings app on your iPad.


=> Tap on your name at the top left and a list will open up. Tap Find My to open its settings then open Find my iPad


=> Toggle off Find my iPad and enter your Apple ID password for verification.


Find My has been turned off now.

Update to the Latest Version of OS and iTunes :

If you’re using any device make sure your OS has been updated to the latest version. we are about to use iTunes for this guide, Mac users with macOS Catalina or later can use Finder for this same process. Mac users who cannot update to the latest version can update their iTunes using the built-in App Store. Windows users can either download iTunes from the Microsoft Store or from Apple’s Website. Once you’re all set let's go

Make an iPad Backup

If you want your data backup in your iPad see the steps below :

=> Open the Settings app on the iPad


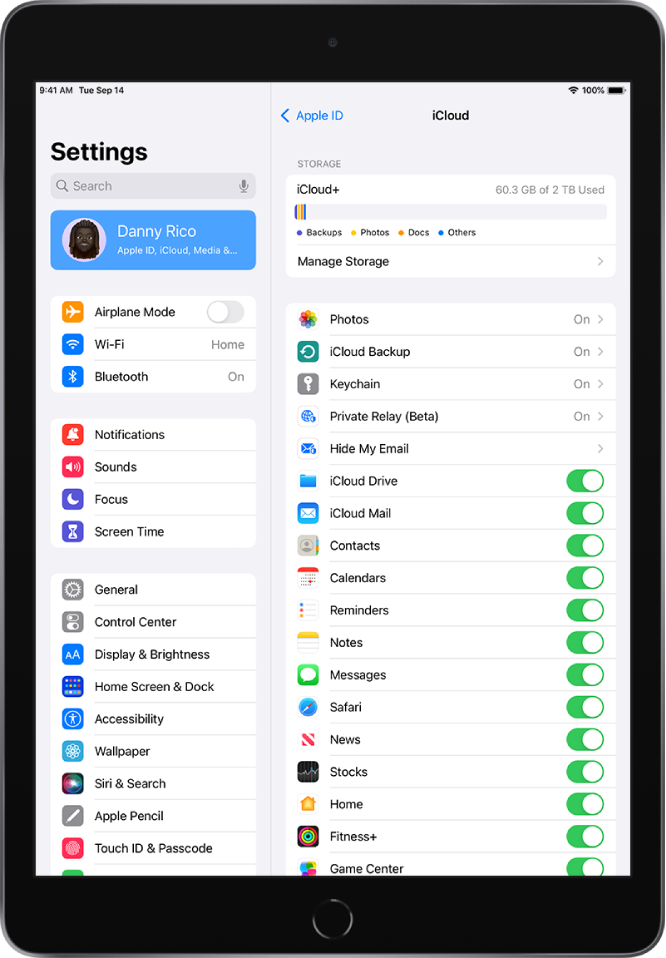
=> Tap your name and then tap iCloud


=> From the list that appears, tap iCloud Backup


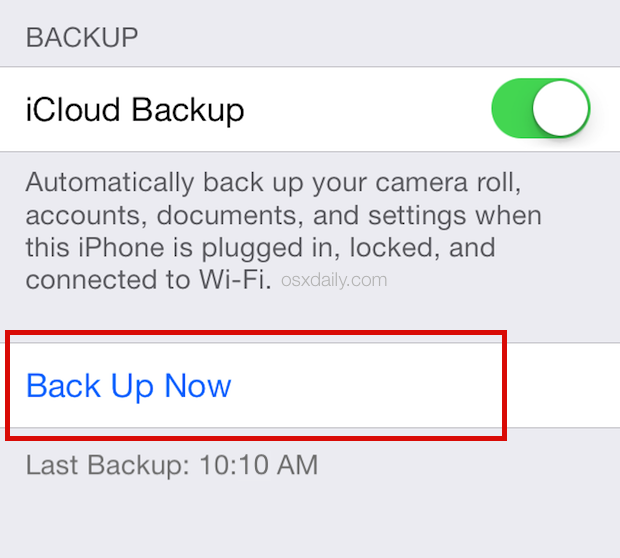
=> Tap the Back Up Now button. Then your done.

How to Factory Reset an iPad with a Computer

For the iPad’s factory reset, This method involves the use of a computer. If you’re trying to reset your iPad with a forgotten passcode or it has been disabled, you can try this method. If you don’t want to go through this trouble, simply skip this section :

=> Connect your iPad to your PC or Mac.

=> Open iTunes or Finder depending on your method.

=> If you see any messages asking you to enter your passcode or any permissions, simply follow them.

=> You will now need to select your iPad in order to factory reset it.

Factory Reset iPad Using iTunes (For Macs Older than macOS Catalina)

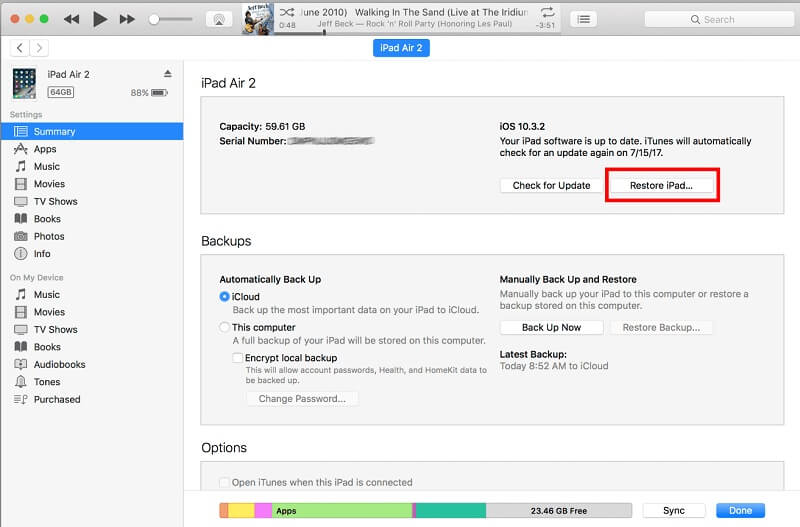
Once your iPad is connected to iTunes you will see it on the upper-left corner of the iTunes window. You will need to click on it to access it and perform a factory reset. If cannot see a device, try reconnecting it or updating your OS and iTunes.


Factory Reset iPad Using Finder (macOS Catalina and Later)

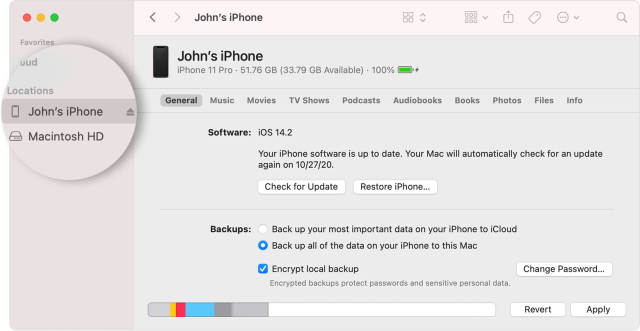
MacOS Catalina or later users having Finder can find their devices in the sidebar of the app. Simply click it to proceed further.


=>  Once selected, you will see all the details regarding your iPad along with the OS version. Among the options, find and tap the Restore iPad button.


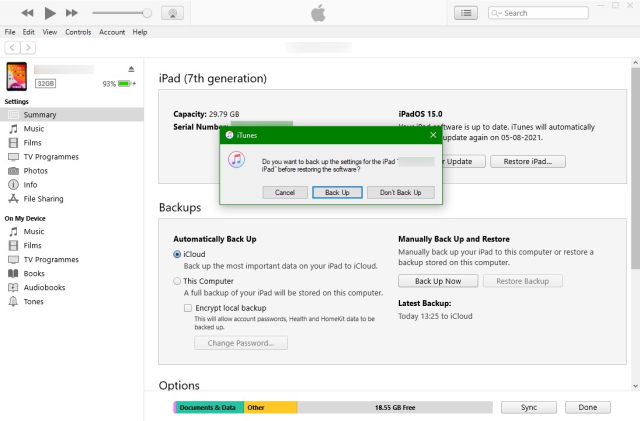
=> A dialog box will now open up asking if you want to make a backup. Depending on whether you made a backup before or simply don’t want to, choose your desired option and proceed.


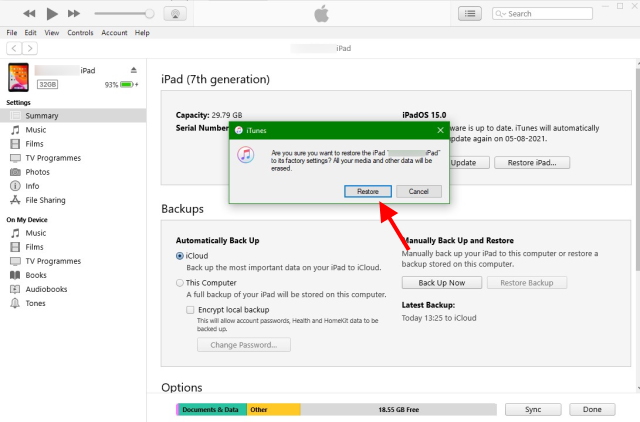
=> A confirmation box will now appear asking you if you’re sure. Click Restore to make your choice and let the factory reset begin.


Once your iPad has been factory reset, you will be met by the initial welcome screen asking you to set it up.

How to Factory Reset an iPad Without a Computer

If you want to get it done faster, The iPad settings offer a factory reset option that will easily delete all your data. However, this will only work if you know your passcode and your iPad is unlocked. For the users whose iPad is disabled, check out how to factory reset a disabled iPad.

=> Open the Settings app on your iPad


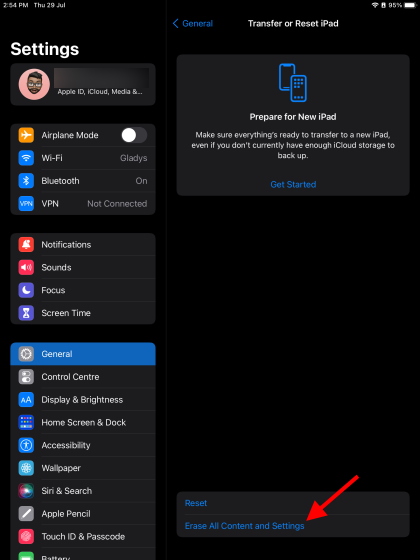
=> Find and tap General and then tap Transfer or Reset iPad


=> Here you will see some options. However, our focus is on Erase All Content and Settings


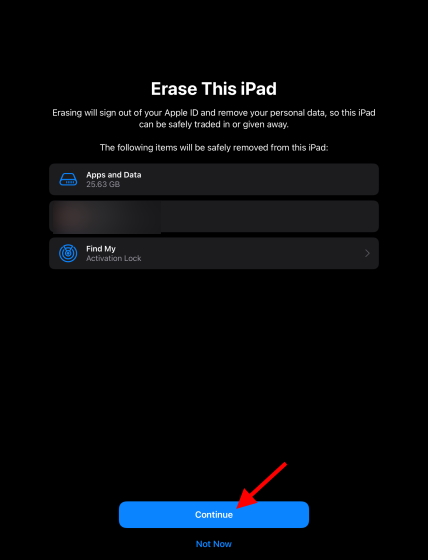
=> You’ll be met by a screen showing you some information and what data will be erased. Once ready, click Continue.


=> Enter your Passcode on this screen and proceed


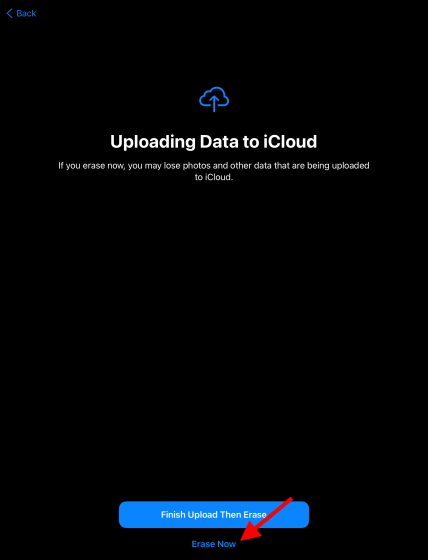
=> You’ll be met by another screen offering a backup. If you’ve already backed up your iPad, select Erase Now and let the factory reset process begin.


The iPad will now begin to reset and should be done in some time. Once through, you’ll be met with the setup screen.

Now your iPad will be looks like band new so, start setting up.


Soft Reset Your iPad Instead

If you want to Reset your iPad because it has been slowing down, hold your horses. Before you go about deleting everything, perhaps you’re better off performing a Soft Reset. If a soft reset for the iPad works, you’ll be saving yourself some time. Follow the steps below to perform a soft reset on the iPad:

=>  Depending on your iPad model, hold the power/lock button.
 => The power slider will appear titled “Slide to power off.” Swipe it to the right to power off your iPad.
=> Once the iPad has been turned off, Hold the power/lock button again until you see the Apple logo and then let go.

Your iPad has now gone through a soft reset. While there is no guarantee that this will fix all your issues, immediate ones like slowing down apps and features should resolve.

How to Force Restart an iPad

If you want to Reset your iPad for completely frozen issue and not responding, there’s a good chance the slider menu won’t open up. In that case, you need to force restart your iPad. Don’t worry as it won’t damage your data :

Method 1: For iPads with a Home Button

If your iPad has a home button, all you need to do is hold the Power and Home button down simultaneously until your iPad turns off. Once done, the iPad will restart on its own. However, if it doesn’t, repeat the process again to do so.
 
Method 2: For iPads Without a Home Button

The process to restart iPads without a Home Button is a little longer but easy nonetheless. Follow the steps below:

1. Press and release the Volume up button quickly.

2. Press and release the Volume down button quickly.

3. Press and hold the Power button until your iPad restarts.

So if find it’s not working for you, you need to be faster in pressing and releasing.


Special thanks to beebom for this article,


That's for the story guys, If you have any words for us please let us know. If you need any article you can tell us in our social media or in comments or through contact us page.


Older Posts

Subscribe To

Posts
Atom
Posts
All Comments
Atom
All Comments

Follow us on

Popular Posts

  • IOS 15 : All you need to know about Apple Mobiles New Operating System
      A s we all know that IOS is the exclusive operating system developed by and used by Apple Mobiles  now as per the annual update we have IO...
  • Process to get Early Access to Task Mate app in India
      Here is how to get Access to Task Mate app : All you need to know about Task Mate app in India      As per reported information Task Mate ...
  • Hidden Features, Tips and Tricks of Facebook
       Hidden Features Of Facebook You Must Know   Facebook: is the social media platform everyone uses, but just don’t lay behind in social med...

Labels

Android (3) Android app (6) Color OS (2) Early-Access (1) Funtouch OS (1) Gadgets (2) Harmony OS (1) How to Guide (8) IOS (4) IOS app (4) MI UI (1) New Releases (10) One UI (2) Oxygen OS (1) Rumoured (3) Tech News (12) Updated Notes (4) Windows 10 (4) Windows 11 (6)

recent posts

Blog Archive

  • ▼  2022 (66)
    • ▼  February (29)
      • Feb 12 (1)
      • Feb 11 (1)
      • Feb 10 (2)
      • Feb 09 (5)
      • Feb 08 (2)
      • Feb 07 (2)
      • Feb 06 (2)
      • Feb 05 (2)
      • Feb 04 (1)
      • Feb 03 (1)
      • Feb 02 (4)
      • Feb 01 (6)
    • ►  January (37)
      • Jan 31 (3)
      • Jan 30 (2)
      • Jan 29 (4)
      • Jan 28 (4)
      • Jan 27 (11)
      • Jan 26 (5)
      • Jan 25 (8)

Created with by TechEra